Wednesday, April 30, 2008

Tom Yum Fried Rice: A Fusion of Expectations

Have you ever bitten into something thinking its one thing and it ends up being another? It always takes you a little off guard, and even if its a good taste, you're still taken aback. Take, for example the famous "Chicken" Pot Pie that's has the standard flaky pie crust, but uses vanilla pudding for the sauce and candy and fruit look-alikes to pass for the veggies. I've also once taken a swig of water, only to find it to be straight up vodka. Now that was a shocker.

Well, today's recipe isn't quite a shocker, but is still a nice surprise nonetheless. I came across Tigerfish's
Tom Yum Fried Rice idea via his Teczcape blog. Loving this spicy and sour Thai seafood soup, I was intrigued that a rice dish could capture the same tangy, hot and sour flavor.

The ingredients are simple - tom yum paste, leftover rice, meats & veggies of your choice, an egg - though I did have some trouble locating lemongrass and ended up paying $4 for 2 stalks. Lemongrass is a key ingredient in many Thai dishes, but I feel that it would still be flavorful without for those of you who can't locate it. I had never cooked with lemongrass, so I also needed to do a little research on what exactly to do with my very expensive stalks (I could have bought a gallon of gas for the same price!) Following this tutorial, I peeled away the outer layers, and 'bruised' the lemongrass bulb with the blunt side of a wide knife. They suggest using a mortal and pestle if you're lucky enough to have one.

Like I've mentioned previously, fried rice is like a "choose your own adventure" adventure. use whatever veggies and meats you have on hand, and be liberal with the spices and seasonings. With such a big pot to work with, its hard to go wrong. For my version of Tom Yum Rice, I also added in some soy sauce and Kecap Manis for color and added taste, garlic, onions and shallots for flavor and an assortment of veggies I had in the fridge. Oh, and some imitation crab I found in the freezer. Feel free to come up with your own version and let me know how it goes!

Tom Yum Fried Rice (serves 4 or 2 very hungry people)

adapted from Teczcape

1 cup of uncooked rice (I like Jasmine rice)
2 eggs, beaten
1 shallot, finely chopped
1 garlic clove, minced
1/4 cup onion, chopped
1/2 - 3/4 pound boneless skinless chicken breast, cut into chunks
(optional meats: beef, pork, shrimp, imitation crab)
1/4 cup frozen corn
1/2 red bell pepper, cut into strips
(optional veggies: sliced carrots, broccoli, mushrooms)
1 stalk lemongrass, use inner white bulb area only. Bruise the lemongrass with the side of a knife or rolling pin.
2 tbsp Tom Yum Paste, dissolved in 1/4 cup of water
1 tablespoon kecap manis (Indonesian Sweet Soy Sauce) (optional, use regular soy sauce if you don't have any)
1 tablespoon soy sauce
sprigs of cilantro for garnish

1. Cook 1 cup of rice per package instructions. Refrigerate rice for at least 4 hours or overnight. Even better, use leftover rice.

2. In a small pan, cook the egg omelet style. Cut into thin strips and set aside.

3. Generously coat a large wok with cooking spray and heat 1 tbsp vegetable oil over medium-high heat. Add shallots, garlic, and onions and cook until fragrant, about 2 minutes. Add in the chopped chicken and sear until browned and almost cooked through.

3. Add in the veggies,lemongrass,and Tom Yum Paste mixture. Saute for 5-8 minutes or until vegetables are crisp-tender.

4. Add in the rice, soy sauce and kecap manis and flip several times to incorporate into the mixture. Add additional tom yum paste mixture as desired. Add in egg and garnish with cilantro if desired.

Sunday, April 27, 2008

Chocolate Drizzled Banana Biscotti

Chocolate Drizzle Banana Biscotti
It's happened again: my house smells like bananas. As much as I love bananas, I absolutely cannot stand the smell of them once ripened. Inconveniently, I also am unable to buy a normal amount of bananas at the grocery and usually end the week with a motley crew of mottled, speckled, and yes, smelly bananas. As a result, I may be posting a few more banana recipes this week. On a side note, hubby has also put me on a one grocery trip a week restriction. As much as I love to plan, I'm not great at planning meals and ingredients for the week so I end up frequenting the grocery store nearly every other day. Each of those "one ingredient" shopping trips ends up being a minimum of $40, so I suppose this restriction is a good thing.

On to the good stuff, today's banana recipe is a Chocolate Drizzled Banana Biscotti. Since I have finally overcome my fear of baking them, a biscotti dunked in a cup of hot tea has become an almost nightly treat for hubby and me. Hmm, how far we've come from our early days of dating when 'biscotti & tea' usually took the form of a couple rounds of beer :)

Like I mentioned, these babies are the perfect accompaniment for a cup of java or tea. The banana taste doesn't come through too strongly -- good when enjoying with a tasty beverage, but not so good when you're in the mood for something banana-y. Next time around, I may experiment with adding more bananas to the mix. As it is, these biscotti are still delicious and satisfy my craving for something sweet and crunchy. Oh, and the chocolate drizzle on top never hurts.

Chocolate Drizzled Banana Biscotti
Adapted from One Smart Cookie
Yield: 2 dozen biscotti (I like mine a little more thick, so I ended up with 1 dozen)

1 3/4 cups flour
1/2 cup sugar
1 teaspoon baking powder
1/4 teaspoon salt
1/2 teaspoon ground cinnamon
1/2 cup mashed ripe banana (about 1 large banana)
1 tablespoon canola oil
1 large egg
1 teaspoon vanilla
semi-sweet chocolate chips or white chocolate chips

Preheat oven to 350 degrees.
  1. In a medium bowl, combine flour, sugar, baking powder, salt and cinnamon. Set aside
  2. In a large bowl, combine oil, banana, egg and vanilla. Mix until well blended. Add flour mixture to the banana mixture and stir until just combined. The mixture will seem dry...very dry, but that's what helps give its crunch later on. You'll need to get in there with your hands to mix the dough until it comes together.
  3. Turn the dough out onto a lightly floured surface, divide in half and shape each piece into a log (about 8"). Place the logs 2-3" apart on a greased cookie sheet. Flatten each log into a rectangle about 3" wide.
  4. Bake for 30-35 minutes, until firm and cracked on top. Transfer logs to a wire rack to cool for 15 minutes. Decrease oven to 275 degrees.
  5. Once cooled, place the logs on a cutting board, and cut each log diagonally into 1/2"-3/4" thick slices with a serrated knife. Place the slices cut side down on the cookie sheet. Return to oven and bake an additional 20 minutes; flip the cookies over and bake another 20 minutes on the other side. Transfer to a wire rack to cool.
  6. Place chocolate chips in a ziploc bag. Place chocolate in microwave for 40 seconds. Continue in 10-15 second intervals until chips are melted. Snip off a tiny corner of the ziploc bag and drizzle over biscotti.

Friday, April 25, 2008

Fun Finds for the Wine Lover

A couple of fun things for your favorite wine lover...or yourself. Happy Friday!

Fusebox wine making kitEver dream of becoming a vintner? Crushpad has come out with a fabulous gift for the wine lover: Fusebox, a do-it-yourself wine blending kit that allows you to recreate tried & true Cabernet blends, or take a stab at creating your own custom blend. The kit comes with six bottles of Napa's finest blending wines, and a 'mystery' vino to liven up the party.

Vinturi Wine Aerator Take the guesswork out of decanting wine with the Vinturi Wine Aerator. Though pretty, aerating wine with a decanter can be a time consuming process, especially if you only need a glass or two of wine. Mixing the right amount of air with your wine, the Vinturi allows your wine to breathe instantly and provides for a smooth finish. We were first introduced to the Vinturi during our Napa Valley trip and have loved ours.

Wine Rack

Lastly, we came back from Napa & Sonoma with more than just a couple extra pounds on our bodies from all the drinking and eating - a fortune's worth of wine to be exact! Our wine tower has run out space for all of our lovely wine, so short of drinking it all very quickly or constructing a wine cellar, I've been on the hunt for some nice wine racks. I found this one from Etsy seller anthony david oliver that I think is sleek, modern & simple.

Wednesday, April 23, 2008

Mango and Black Bean Salad with Sesame Shrimp...and some Kitchen Mistakes

Mango Black Bean Salad with Sesame Glazed Shrimp
Many great things in life have been created by mistake or unintentionally. Take the potato chip, for example. Legend has it that potato chip inventor, George Crum, was a chef at the Moon Lake Lodge in Saratoga Springs, New York. One diner complained that Crum's French fries were too thick for his liking and sent the fries back. Out of spite, Crum decided to irritate the guest by producing fries too thin and crisp to skewer with a fork. The plan backfired as the guest loved them and other diners began requesting Crum's potato chips.

Other unintentional creations? Ice cream cones, chocolate chip cookies, gooey butter cake, and yes, even America's favorite: Viagra.

Where am I going with this? Well, if you can only imagine, I recently botched a recipe as a result of a 'cut and paste error.' You see, I usually bring my laptop into the kitchen with me, but after one too many spills, errant crumbs, and sticky fingers, I've decided to start jotting recipes down or printing them out, lest I lose my laptop to grease splatter. After realizing that I used the salad dressing ingredients for the shrimp marinade, I figured it was too late and continued on anyway. Like many great inventors, I found my creation to be a delight anyway. BTW, this is tongue and cheek- I obviously don't consider myself to be the great George Crum's protege :)

The following recipe for Mango Black Bean Salad with Sesame Shrimp is a perfect dish for the summertime. It's light and refreshing, with a sweet and spicy zing added by lime, sugar and red pepper flakes. I added a little corn for extra color, and extra cilantro because I love it so much. Hubby suggested trying the dish with avocados next time, so if you have some on hand, give it a whirl.

Oh, and if you make this dish, you'll of course notice the ingredients for the shrimp marinade are the same as the dressing ingredients...therein lies my mistake :) Though the end result was tasty shrimp, it may be just as easy to simply season and marinade the shrimp with some olive oil, garlic & salt and pepper.

Mango Black Bean Salad with Sesame Shrimp
4 servings
Shrimp Marinade
1 pound large shrimp, peeled and deveined (I used less, but only because I ran out!)
1/2 teaspoon fish sauce
1 teaspoon sesame oil
1 teaspoon sugar
1 teaspoon fresh ginger, minced
1/4 teaspoon red pepper flakes (adjust according to desired heat level)
1/2 teaspoon minced garlic
1 teaspoon sesame seeds
2 teaspoons olive oil for

Salad
1 can (15 oz) black beans, rinsed and drained
1/2 large cucumber peeled, seeded and cut into chunks
1 small-medium mango peeled, and cut into chunks
1/2 cup corn (fresh or frozen - thawed)
1-2 green onion stalks, thinly sliced
2 tablespoons sesame seed, for garnish

Dressing
juice from one lime
1/4 cup plus 2 tablespoons (or 6 tablespoons) rice vinegar
1/2 teaspoon sesame oil
1 teaspoon extra virgin olive oil
1/2 teaspoon fish sauce
1 1/2 teaspoons sugar
1/4 teaspoon red pepper flakes (adjust according to desired heat level...remember, you can always add more later!)
1/4 cup cilantro, chopped
1 teaspoon fresh ginger, minced

1. In a medium bowl, combine shrimp, fish sauce, sesame oil, sugar, ginger, red pepper flakes, garlic and sesame seeds. Cover and place shrimp in refrigerator until ready to cook, up to 2 hours.

2. In a small bowl, create the dressing by whisking together lime juice, rice wine vinegar, sesame oil, olive oil, fish sauce, sugar, red pepper flakes and ginger.

3. In a separate large bowl, combine black beans, cucumber, mango, corn, green onions and cilantro. Pour dressing over mixture, toss to coat well, and set aside.

4. In a nonstick skillet, heat 2 teaspoons olive oil over medium heat. Saute shrimp until cooked thoroughly, turning once, about 2-3 minutes. Top the salad with the sauteed shrimp, sprinkle with sesame seeds and enjoy.

Friday, April 18, 2008

Small Batch Cinnamon Raisin Biscotti

Cinnamon Raisin Biscotti
Biscotti has always been a favorite of mine, but I've never understood the logistics of making it. How do they end up looking so perfect, crisp and with nice, slanted edges? My first attempt with baking biscotti was an utter disaster. Instead of the elegant biscotti I had hoped for, I ended up with a lumpy and doughy mess---none of the tooth-breaking crunch that I love. I avoided making these again for months, allowing my biscotti cravings to be satisfied by the #1 money extortioner, Starbucks. Well, I'm not sure what inspired me, but I decided to take a second go and have found that with a good recipe, making biscotti isn't all that challenging!

By design, the making of biscotti is not a quick process. The word 'biscotto' roughly translates to "twice baked." The biscotti dough is first shaped into a rectangular log and baked until golden in color and cracking on top. Meanwhile, the scent of cinnamon fills your house! The log is then removed from the oven to cool and the oven temperature decreased to prepare for the second baking. The biscotti are cut into the familiar diagonal slabs and re-baked at a low temperature to allow them to dry out, providing for the crispiness that we all love. I chose a cinnamon raisin recipe from a fabulous cookbook, One Smart Cookie, since I've never actually had this type of biscotti before. More traditional flavorings include anise, chocolate chips or almond cranberry. And because I was tentative of a repeat of past failures, I halved the recipe which resulted in 6 biscotti and a few ends for the chef (me).

For those of you that know me, you know my second passion behind cooking (oh, and my hubby) is gardening. Here's a glimpse of my new spring flowers! (I ate my biscotti on the patio with a cup of coffee, and it was glorious). Our garden has exploded this year as we now have our entire very long patio ledge covered with flowers. We've planted basil from seeds that just sprouted and also a lemon tree.

Oh, and I will have to say that my 3rd passion of late has not been photography. For some reason, I have recently been unable to take a photo for the life of me!

Small Batch Cinnamon Raisin Biscotti
from One Smart Cookie
Makes 6 biscotti

1 tbsp butter, softened
1/4 cup, plus 2 tbsp sugar
1 large egg
1 teaspoon vanilla
1 cup flour
1 teaspoon baking powder
1/8 teaspoon salt
1/2 teaspoon cinnamon
3/4 cup raisins

Preheat oven to 350 degrees.

1. In a large bowl, beat softened butter and sugar until creamy. Add in egg and vanilla until smooth.
2. In a medium bowl, sift together flour, baking powder, salt and cinnamon. Gradually add the flour mixture, along with the raisins to the egg mixture. Stir just until combined. The dough will be dry, so you may need to use your hands to combine as the dough comes together.
3. Turn the dough onto a floured surface. Shape the dough into an 8" long log. Place on a cookie sheet sprayed with nonstick spray, and flatten the log to a rectangle about 3" wide.
4. Bake for 20-25 minutes, until firm and starting to crack on top. Transfer the log to a wire rack to cool for about 15 minutes. Reduce oven temperature to 275 degrees.
5. Once cool, place the log on a cutting board and using a serrated knife, cut each log diagonally into 1/2" - 3/4" slices. Place the slices cut side down on the cookie sheet.
6. Return to the oven for 15 minutes, then flip the cookies over and bake an additional 15 minutes.
7. (Optional): If you like your biscotti very crispy/hard, turn the oven temperature off and allow the biscotti to cool in the oven. (Thanks to my friends at the Cooking Light Board for this tip!)

Thursday, April 17, 2008

Photo(s) of the Day: DJ Frosted Flakes


It's not often that I get a chance to discuss food & fashion together, but I stumbled upon this post from Serious Eats that truly made my day. It appears that Under the Hood has created a line of cereal themed 'streetwear.' Equation going through my head....I cannot begin to tell you how much I love cereal. Hubby's birthday is in the near future. I should amp up his street cred with some of these lovely threads Yikes!


Wednesday, April 16, 2008

Whisknladle: San Diego Restaurant Review

I have been meaning to try out Fresh(er) in La Jolla for quite some time. So long, in fact that it has since closed and has been replaced by Whisknladle, a lovely restaurant with an even lovelier mantra printed on both their menus & above the entrance: "We believe food & wine should be cherished for their simplicity and treated with the most basic philosophy; you get out of the pot what you put into the pot. Our life's mission is to make you feel great, pure & simple." After being seated in their beautiful outdoor patio (perfect for people watching, might I add), Our friendly waiter explained the restaurant's use of local, farm grown organic ingredients and a commitment to serving and using homemade goods: breads, cheeses, cured meats, sorbets, and even ice cream. Well, I'm not sure who's manning the ovens at Whisknladle, but I'd like to thank him personally for the piping hot, crusty rosemary roll that immediately followed.

Outdoor patio at Whisknladle

Though I had to restrain myself from ordering nearly everything on the menu, we started with a Roasted Pear and Vanilla cocktail for myself and a Palm Belgian beer, both new beverages for us. I ended up forgoing my almost inevitable order of ahi tuna and instead chose the Simply Grilled Scallops and Shrimp, served with vegetables from local Chino Farms. Hubby ordered the Red Wine Braised Lamb with Scallion Mashed Potatoes. Though I'm not an overly picky eater, it's still rare that I'm blown away by an entree at a restaurant. Both of our dishes were absolutely excellent. The scallops were seared to perfection and accented by a light white wine sauce with a hint of citrus. Hubby's lamb was tender and flavorful - certainly a hearty, comfort food dish. We ended our amazing meal with the most delicious and light Mini Angel Food Cake topped with strawberries, cream and glazed almonds. Our server and the server assistants were gracious throughout our visit. Never intrusive, but always attentive and energetic about the great things that Whisknladle has to offer.

Bottom line: our service was excellent, the food was overwhelmingly delicious and the outdoor patio provided for some entertaining people watching & will be great this summer. We can't wait to return.

1044 Wall St
La Jolla, CA 92037
(858) 551-7575
info@whisknladle.com

Sunday, April 13, 2008

More Small Batch Baking: Giant Chocolate Chunk Cookies

Chocolate Chunk CookiesIt's Monday and the last thing anyone wants to hear is a little whining. But can I indulge? I'll keep it short. Last week was just one of "those weeks." A stressful, pull your hair out kind of 7 day string. My mind has stopped racing and so has my blood pressure. It's times like this that we turn to the good things in life: huge, chocolate laden cookies to take the edge off. Ok, ok. I know stress eating is not recommended and will never solve your problems (blah, blah, blah), but at least it makes you feel better for awhile :)

I posted awhile back about one of my favorite cookbooks, Small Batch Baking. It's wonderful for portion control, and especially small families like ours (just hubby & me) who don't need to scarf down a dozen cookies, even if we're stressed. Since my cookbook discovery, I've also found great small batch baking recipes at one of my favorite blogs, Cookie Madness. In the height of my stress, I perused Cookie Madness, a blog which literally has a cookie recipe for every type of cookie imaginable (lucky for hubby, baking has been my stress reliever of late-not shopping). These giant chunk cookies are customizable in that you could use any type of add-in you have on hand - cookies, candy, chips. Anna uses crushed oreo cookies, but I added Thin Mints to a few of mine and used mini chocolate chips for all 5 decadent cookies. I added M&M's to another and left the last one plain. The consensus was that the Thin Mint cookie was the best. Be adventurous and have fun making these cookies!

I absolutely love this recipe for so many reasons, but most of all because it only requires one mixing bowl, and no mixer. Easy cleanup is good when you're partaking in stressed out baking.

Giant Chocolate Chunk Cookies
from Cookie Madness' recipe
Yield: 4-5 cookies

4 tablespoons very hot melted unsalted butter
1/2 cup powdered sugar
1/4 cup lightly packed light brown sugar
2 tablespoons beaten egg (break egg, mix it with fork, measure)
1/4 teaspoon vanilla
1/4 teaspoon baking soda
1/4 teaspoon salt
3/4 cup flour
1 teaspoon water (optional)
1/2 cup semi-sweet chocolate chips (I used mini chips)
2 ½ sandwich cookies, broken into chunks (can use nuts instead)
Broken up milk chocolate bar, milk chocolate chips, M&M’s, candies of choice

In a bowl, stir together hot butter, powdered sugar and brown sugar until smooth. If still very hot, let cool for about a minute, then stir in egg. Beat with a spoon until egg is fully mixed then stir in vanilla, baking soda and salt. Add flour and stir just until mixed. If dough seems too dry (falling apart), add the water. Stir in chocolate chips and broken cookies. Shape dough into a fat log of about 5 inches log. Chill for 1 hour. Carefully cut log into 4-5 equal pieces. If chunks of cookies and chips fall out, just stick them back onto the cut pieces.

Place cut pieces, spaced about 4 inches away from each other, 4-5 to a sheet, on an ungreased cookie sheet. Bake at 325 degrees F for 18 to 20 minutes, rotating pan halfway through. Cool on cookie sheet for 3 minutes, then transfer to a wire rack to continue cooling.

Thursday, April 10, 2008

Photo of the Day: Ritz Crackers Anyone?

Kirk from mmm-yoso! just returned from Vietnam and posted gorgeous photos of his trip. Seeing his pictures made me a little nostalgic and inspired me to look through my own albums. I visited Hanoi a few years back to see hubby while he and his best friend took "sabbaticals" and backpacked throughout Asia for a few months (tough life, huh?!) In any case, the photo above was taken in picturesque Halong Bay, one of the most beautiful and serene places I've ever been. We joined a 2 day junk boat cruise, which despite the name was not junky at all. You can imagine our surprise when a floating market paddled up to our boat, filled to the brim with goodies like Ritz crackers, Oreos and Lays...in the middle of a bay in Vietnam, a UNESCO World Heritage site to be exact. After spending countless numbers of days eating foreign foods, a few Oreos never tasted so good :)

Tuesday, April 8, 2008

White Bean Chicken Chili for the Spring

First off, thanks to everyone for all the nice messages about the race. My legs are finally starting to feel normal again! Now, on to the good stuff...

Though spring is here, the sun is out and the birds are chirping away, the SD nights are still cool enough that I have been craving a warm, tasty bowl of comforting chili. White Bean Chicken Chili is a wonderful transition soup: lighter than traditional chili, but still hearty and full of goodies. This recipe from the Dine and Dish blog starts with onions, garlic and chicken sauteed in a little olive oil. Adding water while the chicken is still cooking creates a flavorful broth. Half of the beans are then pureed with chicken broth, and added to thicken the soup along with more beans, extra sweet corn, and spices. I used fire-roasted green chilies (mild) to add depth, but not too much heat. Finally, I of course forgot that I had run out of chili powder so I quickly searched the web and found this recipe for homemade chili powder. (What did I used to do without google?!) . I let this baby simmer on low for a little longer than called for in the recipe to let the flavors meld. When finished (or when we were too hungry to wait any longer), I garnished the soup with fresh cilantro and served with a side of my favorite Trader Joe's Mediterranean bread. I'm glad it turned out well since we have enough chili to last us through the next two seasons :)

Kitchen notes: Be sure to use a big soup pot or Dutch oven. The soup filled my large Calphalon pot to the brim! Use a handheld immersion blender to pureé the beans and broth, if desired. I don't have one so I used my food processor and it got a tad messy. This soup is definitely better the next day as it has a chance to thicken up and the flavors have a chance to come out.

White Bean Chicken Chili
1 medium onion, chopped
1 tablespoon olive oil
2 garlic cloves, minced
8 boneless skinless chicken breast halves, cut into bite-size pieces (I used about 1lb of chicken tenders)
3 cups water (I used 2.5 cups)
1 teaspoon salt
2 teaspoons ground cumin
1 teaspoon chili powder
1 teaspoon pepper
1 teaspoon dried oregano
4 (15-ounce) cans cannellini or great Northern beans, rinsed, drained, and divided
1 (14 1/2-ounce) can chicken broth
1 (16-ounce) package frozen extra sweet white corn
2 (4.5-ounce) cans chopped fire-roasted green chiles
3 tablespoons lime juice
Garnish: fresh cilantro sprigs

Sauté chopped onion in hot oil in a large Dutch oven over medium-high heat 7 minutes; add garlic, and sauté 2 to 3 minutes.
Stir in chicken pieces, and cook, stirring constantly, until chicken is lightly browned. Stir in 3 cups water and next 5 ingredients; reduce heat, and simmer, stirring often, 10 minutes or until chicken is done.
Place 2 cans of beans in a blender; add broth, and process until smooth, stopping to scrape down sides.
Stir bean pureé, remaining 2 cans of beans, corn, and chiles into chicken mixture in Dutch oven; bring to a boil over medium-high heat. Reduce heat, and simmer, stirring often, 30 minutes or until thoroughly heated. Stir in lime juice just before serving. Garnish, if desired.

Monday, April 7, 2008

Happily Back Home with Sore Legs!

Sorry if you received a blank post in your Google Reader...it's Monday and I'm still trying to get back in the swing of things.

Well, we're finally back home for at least two weeks until we take off for a camping trip to Joshua Tree. The wedding was great and despite too much drinking and eating during the festivities, we managed to finish our half marathon. Hubby and I both did way better expected, especially considering our previous days' activities :)

Results: I got 9th out of 1084 participants in my gender/age group with a time of 1:38:44! This is certainly a PR for me, and I'm quite excited. Here's a somewhat embarrassing action shot for you all to enjoy:
We lucked out with sunshine and good weather. Now, I'm just recovering from some very sore legs. Since I can't move very far, I'm sure I'll spend some time in the coming days making some new recipes from my very fat "to-make" list. I'll keep you posted!

Thursday, April 3, 2008

Chocolate and Banana Marbled Bread

Chocolate and Banana Marbled Bread Well, we're out of town yet again. Feels like we're never home, but we're attending a wedding of two of hubby's close friends and running a half marathon this weekend, so at least we make the most of our time away! Unlike many, I actually enjoy visits to the grocery store (is it sad to list it as one of my hobbies?!) and as a result overpurchased this week, forgetting that we'd only be home for a few days. In an effort to clear the refrigerator and pantry, I made Chocolate and Banana Marbled Bread instead of packing. Oops.

I have stuck by a classic banana bread recipe for ages, but thought I should branch out, though somewhat OCD hubby is always a little skeptical. Boy, am I glad that i did. This bread is sweet, moist & flavorful. Because I was afraid the chocolate would overpower the banana taste, I made sure to use big, ripe bananas that would hold their own. I also added vanilla and cinnamon to ensure the banana-only bites were not too bland. Next time, I might add in some chocolate chips or even peanut butter chips to add an extra kick. Yum! Hmm, and maybe I'll work on my 'marbling' technique as well.
Chocolate and Banana Marbled Bread Slices 
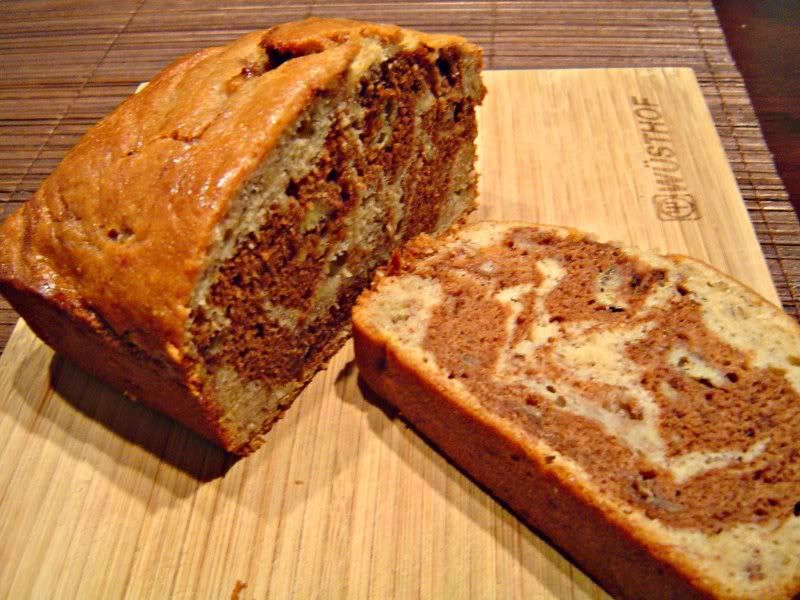
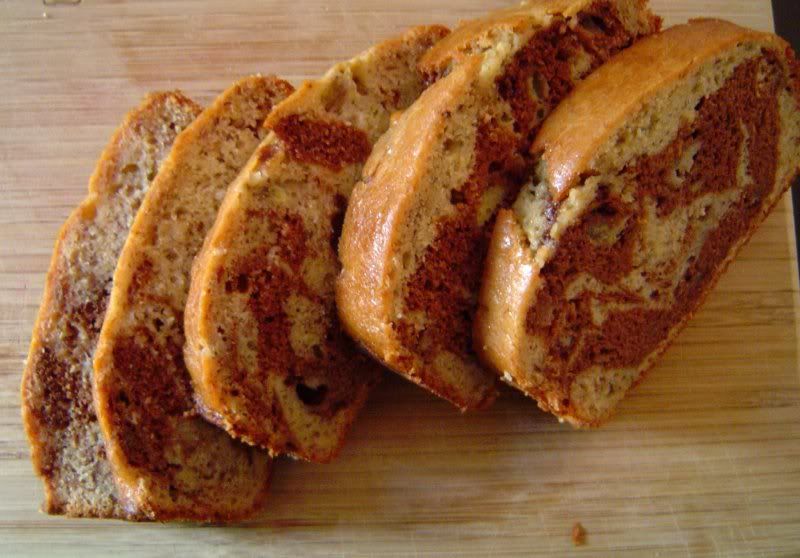
Oh, and if you're wondering why the loaf pictured above is so small, it's not a mini loaf. It's what was left after a few minutes out of the oven :)

Since this is my new favorite banana bread recipe, I'm entering it into the Not Quite Nigella Banana Bread Bake-Off. Click the link for more details!

Chocolate and Banana Marbled Bread
Adapted from Cooking Light
1 1/2 cups all-purpose flour
1/2 cup whole wheat pastry flour (ok to use all purpose flour)
3/4 teaspoon baking soda
1/2 teaspoon cinnamon
1/2 teaspoon salt
1 cup Baker's sugar (ok to use granulated)
1/4 cup butter, softened
1 1/2 cups mashed ripe banana (about 3 large bananas)
1/2 cup egg substitute (or 2 eggs - I found this to be better)
1/3 cup plain low-fat yogurt
1 teaspoon pure vanilla extract
1/2 cup semisweet chocolate chips
Cooking spray

1. Preheat oven to 350°.Lightly spoon flour into dry measuring cups, and level with a knife. Combine the flours, baking soda, cinnamon and salt, stirring with a whisk.
Place sugar and butter in a large bowl; beat with a mixer at medium speed until well blended (about 1 minute). Add banana, egg substitute, yogurt and vanilla; beat until blended. Add flour mixture; beat at low speed just until moist.

2. Place chocolate chips in a medium microwave-safe bowl, and microwave at HIGH 1 minute or until almost melted, stirring until smooth. Cool slightly. Add 1 cup batter to chocolate, stirring until well combined.

3. Spoon chocolate batter alternately with plain batter into an 8 1/2 x 4 1/2-inch loaf pan coated with cooking spray. Swirl batters together using a knife. Bake at 350° for 1 hour or until a wooden pick inserted in center comes out clean. Cool 10 minutes in pan on a wire rack; remove from pan. Cool completely on wire rack and try not to eat entire loaf in one sitting.

*Note-if you don't have whole wheat pastry flour, just use a total of 2 cups of all purpose flour.

Tuesday, April 1, 2008

Lighter Penne Rustica

Lighter Penne Rustica
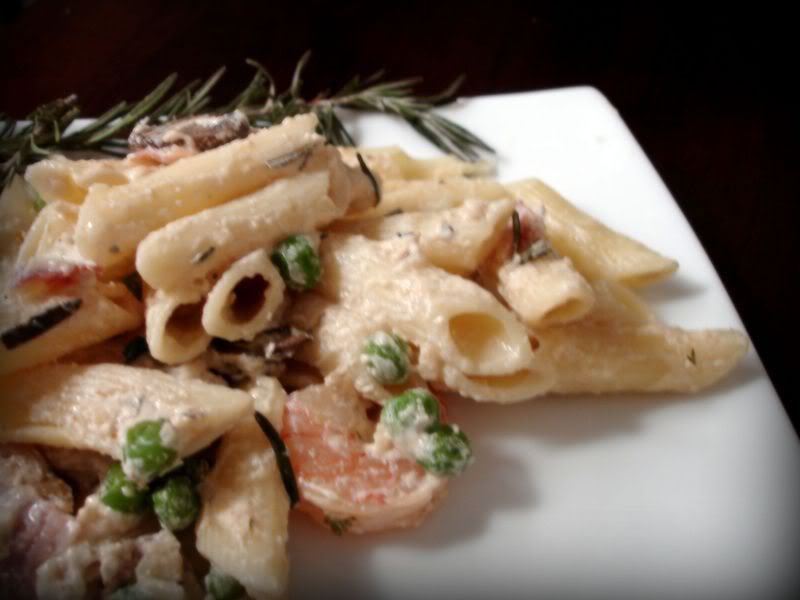
It's a tough life being a food lover and blogger. I spend too much time perusing other foodies' blogs and drooling over their creations with an end result of an exploding list of recipes to try. I finally got around to crossing one off: a delicious pasta dish that I first saw on Mr Orph's Kitchen blog. Penne Rustica is full of smoky prosciutto, chicken and shrimp, mixed in with a creamy sauce accented by peas. Though the recipe sounded divine, I knew I needed to lighten it up without compromising on taste. Hubby had just been on a cheeseburger bender (long story) and as his wife, it's my duty to look out for his cholesterol, right? :)

I ended up decreasing the butter & cheese, using fat free half and half instead of cream, and adding some mushrooms in for good measure. The dish resulted in hubby proclaiming his never-ending love for me, and internally thanking all of our wedding guests for buying us such nice kitchen gear (that 6 months later still inspires me to cook). This is probably the most sinful tasting, yet not-really-that-sinful dish I've ever made. We enjoyed this dish with a 2005 Chateau St Jean Chardonnay we brought home from Sonoma & some warm French bread.

Penne Rustica
adapted from Mr Orph's Kitchen
1 pound penne rigate pasta
2 chicken breasts, chopped
1 lb medium shrimp, peeled and deveined
1/2 cup sliced mushrooms
1/2 cup prosciutto, chopped
3/4 cup frozen peas
1/4 cup grated Parmesan cheese
1 tbsp fresh flat-leaf parsley minced, for garnish
salt and pepper
1 tablespoon olive oil

For the sauce:
1 tbsp butter
2 tbsp minced garlic
2 tbsp fresh rosemary minced
1/2 cup marsala wine
2 cups fat free half and half (or use heavy cream if you prefer)
3/4 cup grated Parmesan cheese
1/2 cup nonfat milk
1 tbsp cornstarch
1 tbsp Grey Poupon Dijon mustard
1 teaspoon kosher salt
1/2 teaspoon dried thyme
1/8 teaspoon cayenne pepper
pepper, to taste

Preheat the oven to 475 degrees

1. Cook pasta according to package directions and drain. Set aside.

2. Season chicken with salt and pepper. In a medium skillet over medium-high heat, saute chicken in olive oil until brown on both sides, about 4 minutes. Add shrimp and mushrooms; cook until shrimp is almost done (just turning pink), about 2-3 minutes. Remove chicken, shrimp, and mushrooms from pan and transfer to plate. Cover with foil to keep warm.

To make the sauce:
3. Using same skillet, melt the butter over medium heat, scraping up any browned bits. Add minced garlic and rosemary and cook for approximately 2-3 minutes, or until garlic begins to brown. Add the marsala wine and cook for an additional 5 minutes or until marsala wine is reduced.

4. Add the half and half, 3/4 cup Parmesan cheese, dijon mustard and spices (salt through cayenne pepper). Add salt and pepper to taste.

5. Combine cornstarch and milk in a small bowl or glass. Whisk the cornstarch slurry into the sauce and continue whisking until smooth.

6. Bring sauce to a simmer and simmer until sauce thickens. Add chicken, shrimp, prosciutto, and peas and combine. Cover and turn off heat.

7. Assemble the dish by spraying a 13 x 9 baking dish with non-stick spray. Pour in the pasta. Add the sauce and mix well. Top with additional Parmesan cheese. Bake in the oven for 10-12 minutes until heated through and the cheese is melted & bubbly. Garnish with parsley.