Thursday, February 28, 2008

Choose Your Own Adventure Fried Rice

I always loved those books. :)
A great thing about fried rice is that not only can you use all your leftovers (cold rice is best for this dish so as not to have mushy fried rice), but there are no exact measurements needed. I watched my Mom make this dish growing up and was equally intrigued and confused as she threw in spices, sauces and seasonings at what seemed at random. Somehow, the fried rice always came out just right. When I asked her in college to send me the recipe so that I could impress my friends with my Asian culinary skills, she went a little silent then told me I was a fool for asking...there is no recipe - you have to "spice by sight." OK.
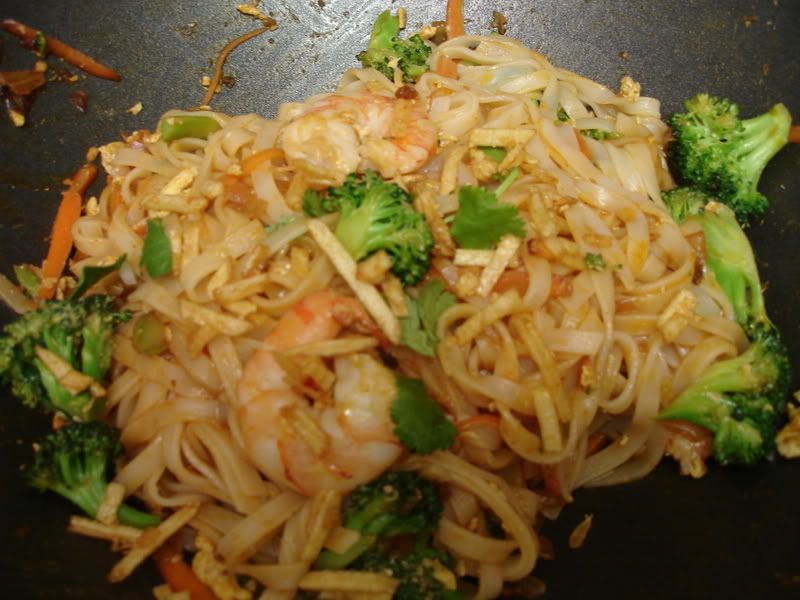
After some trial & error, I think I have it down. The vegetable add-ins and meat are usually decided at the spur of the moment. Because I am going out of town I tried to use up all the vegetables in the house. For the following recipe, I'll let you choose your own veggies, and here's a picture of what I used as a guideline.

For the meats, I only had a little stir fry pork leftovers, so I threw that in as well. I usually like to add chicken and shrimp. Though again, I urge you to choose your own adventure here! Lastly, there's a special ingredient in here that many of you may not have on hand. Kecap Manis is a sweet soy sauce from Indonesia. It has a much thicker consistency and sweeter taste than the typical soy sauce and is available in most Asian grocery stores. A popular brand is ABC.

Choose Your Own Adventure Fried Rice
2 cups cold cooked rice (white or brown)
1 tablespoon vegetable oil
1/4 cup onion, finely chopped
2 shallots, finely chopped
1 garlic clove, chopped
1 egg, beaten
assorted vegetables finely chopped (i.e. -cabbage, carrots, broccoli, bean sprouts)
assorted meats (again, choose your own - chicken, shrimp, pork)
2 tablespoons kecap manis (Indonesian Sweet Soy Sauce)
2 tablespoons soy sauce
1 tablespoon ketchup
cilantro sprigs (optional)
Generously coat a large wok with cooking spray and heat 1 tbsp vegetable oil over medium-high heat. Add shallots, garlic, and onions and cook until fragrant, about 2 minutes. Add the remainder of vegetables and cook, stirring, until crisp-tender, about 3-4 minutes. If you are incorporating meat, add it here and saute until done.

Add the kecap manis, soy sauce, ketchup and rice and stir until combined and heated through, about 4 minutes. Make a well in the center of the rice and add the beaten egg to the middle. Allow the egg to set for about 1-2 minutes and then incorporate the egg into the rice until cooked through. Continue flipping the rice with a spatula, until hot. Ensure that you scrape the bottom of the wok to loosen any rice that has crisped on the bottom. Serve with Cilantro sprigs, if desired. Enjoy!

Tuesday, February 26, 2008

Shrimp Pad Thai

Shrimp Pad Thai
As a child, I was more accustomed to eating Southeast Asian cuisine than McDonald's. At the time, I was a little embarrassed about this fact and always wondered why my Mom didn't have meatloaf & mashed potatoes on the dinner table like the rest of my friends. She always tried, but cooking 'western-style' dishes was a labor of love, and she never felt entirely comfortable doing it.

These days, I call my Mom regularly for these same Southeast Asian recipes and wonder why I didn't pay closer attention to her cooking. Though I sometimes find the exotic ingredients and spices intimidating, I always love a good trip to the local Asian grocery that is no fail, always packed with more customers than it can handle. I had purchased tamarind for another recipe of my Mom's, and was left wondering what to do with the remainder. I happened upon this recipe for Vegetarian Pad Thai from Gourmet magazine. I re purposed the recipe to include the veggies that I had in the refrigerator and my all time favorite, shrimp. I forgot to think ahead and soak the noodles, so I ended up just boiling until al dente, making sure not to overcook as they would be sauteed shortly afterwards.
Though the dish is probably not 100% authentic, we still enjoyed it & hope you do too!

Shrimp Pad Thai
12 ounces dried flat rice noodles (1/4 inch wide; sometimes called pad Thai or banh pho)
3 tablespoons tamarind (from a pliable block)
1 cup boiling-hot water
1/2 cup light soy sauce and 1 tbsp soy sauce, divided.
1/4 cup packed light brown sugar
2 tablespoons Sriracha (Southeast Asian Chili sauce)
1/4 cup peanut or vegetable oil
2 large eggs, beaten
2 garlic cloves, finely chopped
1/4 cup finely chopped onion
1/4 cup carrots, sliced matchstick style
1/2 cup broccoli florets, chopped into bite sized pieces
10 jumbo shrimp, peeled and deveined
1/2 cup roasted peanuts, coarsely chopped (optional)
cilantro sprigs

Preparation
Soak noodles in a large bowl of warm water until softened, 25 to 30 minutes. Drain well in a colander and cover with a dampened paper towel.

Meanwhile, make sauce by soaking tamarind pulp in boiling-hot water in a small bowl, stirring occasionally, until softened, about 5 minutes. Force mixture through a sieve into a bowl, discarding seeds and fibers. Add 1/2 cup soy sauce, brown sugar, and Sriracha, stirring until sugar has dissolved.

Heat oil in wok over medium heat until hot, then saute onions over medium-low heat, stirring frequently, until golden-brown, about 6 minutes. Add 1 tbsp. of soy sauce to the onions. Add garlic, broccoli and carrots and saute for an additional 4 minutes. Add eggs and swirl to coat side of wok, then heat until cooked through. Break into chunks with spatula. Finally, add shrimp and continue to saute until shrimp is almost cooked through, approximately 3 minutes.

Add noodles and continue to stir-fry over medium heat (use 2 spatulas if necessary) 3 minutes. Add 1 1/2 cups sauce and simmer, turning noodles over to absorb sauce evenly, until noodles are tender, about 2 minutes.
Stir in additional sauce if desired, then transfer to a large shallow serving dish. Sprinkle pad Thai with peanuts and cilantro sprigs.

Friday, February 22, 2008

Have a Tea Party


While perusing the web for a hostess gift for an upcoming party, I happened upon the most intriguing tea set, Teaposy Flower Art Tea Medley, that I am tempted to gift to myself. A blooming tea pot! "Each teaposy is made from premium Silver Needle White Tea leaves and whole dried flowers that are hand-crafted with natural cotton thread. Add hot water and watch the teaposy slowly unfurl, revealing a flower that blossoms from within the tea leaves. The delicate and complex tea is a treat for your taste buds as well. Each blossom medley includes six individually vacuum-sealed blooming teas: heart of love, falling water, butterfly, calendula, lady fairy, and noble essence." Here's a better picture of what the tea flower looks like:


Now that's a conversation starter! It's like the Chia Pet of tea, but only a little bit classier :)

Tuesday, February 19, 2008

Chewy Oatmeal Raisin Cookies - Marathon Style

I have an oatmeal raisin cookie recipe that is my tried and true perfect recipe. The cookies come out perfectly every single time, and my hubby and I enjoy eating so many we feel sick. Unfortunately for you, I'm not posting it today since that would mean I'd have to make a batch and I can't afford to eat a dozen cookies today.m
I attempt to cook healthy and relatively low fat dishes on a daily basis but I have never really caught on to the low fat baking craze. There's something that just doesn't ever seem right with low fat cookies and cakes, though that doesn't mean I'd turn them down! But, because its a new year and we have also decided to run a half marathon in a few weeks, I tried to hunt down a yummy treat recipe that is a little healthier than the norm. I came across David Lebovitz's blog and found a recipe adaptation from Nick Malgieri's Perfect Light Desserts: Fabulous Cakes, Cookies, Pies and More Made with Real Butter, Sugar, Flour, and Eggs, All Under 300 Calories Per Generous Serving cookbook. (whew...how did his editor let him get away with that title?!) I liked David's take on the recipe, though I have only a few requirements for my oatmeal raisin cookies that I found missing: heavy on cinnamon and fat, plump raisins. So, I made additional tweaks by adding spices and soaking the raisins in eggs & vanilla. Since the raisins soak up some of the liquid, I didn't want the cookies to be dry so I added an egg white. Soaking the raisins may sound strange, but it works like a charm.
While making the cookies, I was surprised by the wetness of the dough as my 'typical' cookie dough is a little on the sticky side. Because of my nervousness, I added a few dashes of oats while the Kitchenaid was in action. Chewy Oatmeal Raisin Cakes
Verdict: I was suprised to find that the end result were plump beautiful looking cookies. So plump that they almost look like big fluffy breakfast cookies (more cake like in texture than you'd expect). These certainly don't taste as sinful as a normal cookie, but I suppose its because they're not really sinful at all. They are a fabulous compromise considering the very low butter and fat content, but I sure do miss the real thing sometimes. If it were my recipe, I'd rename them Oatmeal Raisin Breakfast Cakes. Come to think of it, next time I may try adding protein powder and re-purposing this recipe to a workout / protein cookie...now that's Marathon Style! Try these out and let me know what you think!
Edit: Hubby came home & wasn't as pleased with these as me. He liked them, but said they're like muffin tops (which isn't necessarily a bad thing)! Looks like I'll be posting my old tried and true recipe in a few days :)
Sharon's adaptation of David's adaptation of Nick Malgieri's cookies
1 large egg, beaten
1/2 cup raisins
1 teaspoon vanilla extract
1 teaspoon baking powder
1/2 teaspoon baking soda
1/2 teaspoon salt
1 1/2 teaspoon ground cinnamon
2 tablespoons unsalted butter, at room temperature
1/2 cup granulated sugar
1/2 cup (packed) light brown sugar
1 egg white
1/4 cup unsweetened applesauce
1 1/3 cups rolled oats (don't use instant or quick oats)
baking sheet lined with parchment paper or silicone mat
Preheat the oven to 375 degrees and set the rack on the lower and upper thirds of the oven.
1. In a small bowl, beat egg and vanilla. Soak the raisins in the egg mixture for approximately an hour.
2. In another small bowl, whisk together the flour, baking powder, baking soda, cinnamon and salt.
3. In a large mixing bowl, beat the butter and granulated sugar until smooth. Mix in the brown sugar, then the egg white and applesauce
4. Stir in the dry ingredients, then gradually add the egg and raisin mixture. Once it is incorporated, add the oats.
5. Drop the batter by rounded tablespoons on the baking sheets and use a fork to gently flatten the dough.
6. Bake the cookies for approximately 13-15 minutes, or until they "look dull on the surface but are moist and soft", according the Nick. Rotate baking sheets during baking for even heating. (I made my cookies very big, so cook for less time if you are using a teaspoon or cookie dough scoop).
Storage: Once cool, store the cookies in an airtight container at room temperature.

Monday, February 18, 2008

Shrimp and Sausage Saffron Rice

Cooking with the worlds' most expensive spice can be an adventure. It is estimated that it takes some 14,000 stigmas to produce only one ounce of saffron threads. This labor-intensive process contributes to the figures that the bright red threads can soar upwards of $50 per quarter-ounce. Wow, don't really want to mess up a dish with these costs. I could almost fill up my gas for the same amount of money!

Well, I am always up for a culinary experiment, though one with saffron needs to be taken a little more seriously in the event of failure. Luckily, this recipe is a fairly simple one, yet still full of flavor and complexity. The saffron lends the rice a beautiful, deep yellow color. In fact, one part saffron to 150,000 parts water will still turn the water a bright yellow and impart a distinctive flavor.

Shrimp and Sausage Saffron Rice
(adapted from Real Simple)
2 teaspoons olive oil
8 ounces andouille sausage, sliced 1/4 inch thick (I substituted keilbasa I already had)
1 medium sweet onion, thinly sliced
1/2 cup chopped green bell pepper
1/2 tsp minced garlic
1/2 cup dry white wine
1 14.5-ounce can low-sodium chicken broth
12 saffron threads, crumbled
1 cup long-grain white rice
3/4 pound medium shrimp, peeled and deveined
1/3 cup frozen peas
1/2 teaspoon kosher salt
1/2 teaspoon black pepper
3 sprigs fresh cilantro, chopped

Heat the olive oil in a wok over medium-high heat. Add the sausage and brown on both sides. Reduce heat to medium and add the onions and green peppers. Saute, until onions are translucent and tender. Add garlic. Deglaze the wok by adding the wine and cook for 2 minutes, scraping up any brown bits. Add the broth, saffron, and rice and bring to a boil. Reduce heat, cover, and simmer for 15 minutes. Stir the shrimp and peas into the rice, cover, and cook for 5 minutes. Remove from heat. Season with the salt and pepper. Spoon onto plates and add the cilantro.

Wednesday, February 13, 2008

Happy Valentine's Day with Brownie Peanut Butter Cupcakes


The weird cupcakes in the middle were my feeble attempt to make a powdered sugar heart. Seemed easy enough, but they didn't come out quite right!
There's nothing quite like saying 'I love you' with some good old fashioned desserts. I didn't want to make anything too fancy since I knew we'd be stuffed after our Italian feast. I modified the original Brownie Cupcake recipe (Bon Appétit) by adding a handful of chocolate & peanut butter chips directly to the batter instead of nuts. Lastly, when making the frosting, ensure that your butter is room temperature, otherwise you'll have a hard time getting the creamy consistency you want. These are tasty!
Brownie Cupcakes
6 tablespoons unsalted butter, cut into 4 pieces
1 1/4 cups chocolate and peanut butter chips (I buy the bags that have a mixture of both)
3 ounces unsweetened chocolate, chopped
1/2 cup (packed) golden brown sugar
1/3 cup sugar
2 large eggs
1 teaspoon vanilla extract
1/2 cup all purpose flour
1/4 teaspoon salt

Frosting
1 cup powdered sugar
3/4 cup creamy peanut butter (do not use old-fashioned or freshly ground)
1/4 cup (1/2 stick) unsalted butter, room temperature
1/4 teaspoon vanilla extract
4 teaspoons (about) whipping cream
Chocolate shavings or chocolate sprinkles (I was lazy and used pb chips)

For cupcakes: Preheat oven to 350°F. Line 10 standard muffin cups with paper liners. Combine butter, 1/2 cup chocolate chips, and unsweetened chocolate in top of double boiler set over simmering water. Stir until mixture is melted and smooth. Remove from over water. Whisk both sugars into chocolate mixture, then whisk in eggs 1 at a time. Whisk in vanilla, then flour, salt, and remaining 3/4 cup chocolate chips. Divide batter among prepared muffin cups (about 1/4 cup for each). Bake cupcakes until tester inserted into center comes out with moist crumbs attached, about 20 minutes. Transfer cupcakes to rack and cool completely.


For frosting: Put powdered sugar and next 3 ingredients in medium bowl. Using electric mixer, beat until mixture is smooth, adding whipping cream by teaspoonfuls if frosting is too thick to spread. Spread frosting in swirls over top of cupcakes. Sprinkle with chocolate shavings or chocolate sprinkles. (Can be made 1 day ahead. Store in single layer in airtight container at room temperature.)

Trip to Marukai Market

As many in the San Diego area know, a new Marukai Market recently opened that carries a variety of Japanese & Hawaiian foods. I finally got a chance to sneak away and visit myself. Though the market is small, they have a nice variety of seafood, produce, noodles and sauces. Of course, one of my personal favorites was the colorful and tempting Japanese candy and treat aisle, though I tried my best not to linger too long. I did stay long enough to scope out the copious amounts of Pocky flavors. I think they had just about every flavor my little head could dream of. (For those not familiar, Pocky are little breadstick-ish treats covered in chocolate or strawberry to name two common flavors). The seafood aisle was well equipped with nicely sized portions of fish and at very reasonable prices. I bought myself some fresh tuna for about 3.50 that I plan on searing for dinner tonight with soy & garlic.
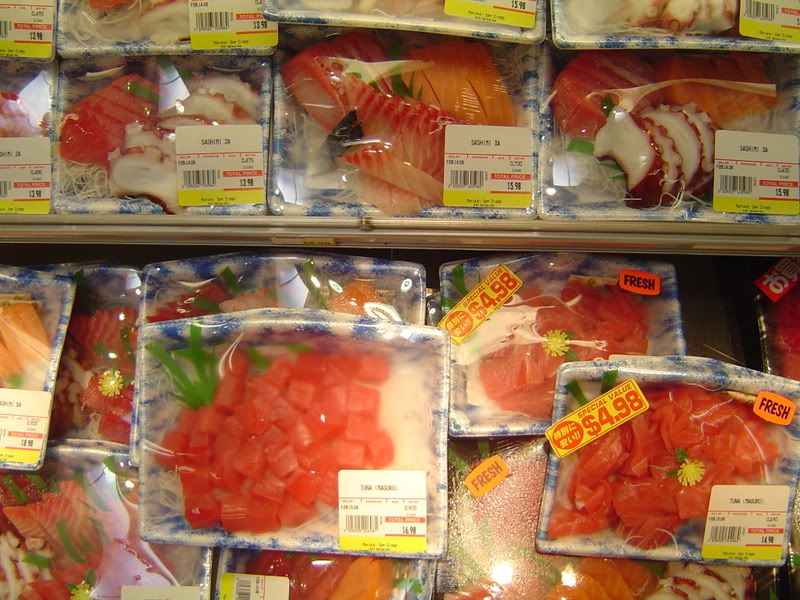
Here's a photo of some of my loot: Saimin noodles from Hawaii, Satsuma oranges and of course, the tuna I"m cooking tonight!

Marukai Market
8151 Balboa Ave
San Diego, CA 92111
Check out the mmm-yoso blog for a lot of great pictures of Marukai.

Monday, February 11, 2008

Baked Shrimp with Tomato Feta Orzo

Baked Shrimp with Tomato Feta Orzo From appearances, orzo looks just like rice but in reality is just a rice-shaped pasta. Tricky. I went to the grocery searching for orzo in the rice aisle, but had to remind myself that it was just an illusion....orzo is a pasta!

The most time consuming part of this recipe is peeling and deveining the shrimp. If you are so inclined, many grocery and seafood stores will sell raw shrimp already cleaned, but I wasn't willing to pay up for this luxury. We thought this dish was excellent - light, but full of flavor. It's certainly a nice alternative from a typical pasta dish. Unfortunately, we were so hungry last night that I failed to take a photo of our feast. The picture above is some leftovers, which are never quite as appetizing in appearance the next day. Enjoy nonetheless!

Baked Shrimp with Tomato Feta Orzo
Ingredients
1 medium onion, finely chopped
3 garlic cloves, minced
1/2 teaspoon dried oregano
1/2 teaspoon dried hot red pepper flakes
2 tablespoons olive oil
1/2 cup dry white wine
1 (28 to 32-ounce) can crushed tomatoes
1 teaspoon kosher salt
1 1/2 pounds large shrimp, shelled and deveined
1 pound orzo
1/2 cup sliced mushrooms
2 cups crumbled feta

Preheat oven to 425 degrees. Saute onion, garlic, oregano, and red pepper flakes in 1 tablespoon olive oil in a large pot over moderately high heat, stirring, until onion is softened, about 3 minutes. Add wine and boil until reduced by 1/2, about 3 minutes.

Stir in tomatoes, mushrooms and salt, then reduce heat, and simmer briskly, stirring frequently, until slightly thickened, about 8 minutes. Stir shrimp into sauce and simmer, stirring occasionally, until shrimp are just cooked through, about 3 minutes. Be sure not to overcook the shrimp as they will continue to cook in the oven.

While sauce and shrimp are cooking, cook orzo in a 6-quart pot of boiling salted water until al dente. Reserve 1/2 cup cooking water, then drain orzo in a sieve. Return orzo to pot and toss with remaining tablespoon oil. Stir in sauce with shrimp and reserved cooking water, then add salt and pepper, to taste.

Spoon 1/2 of pasta into an oiled 13 by 9 by 2-inch glass baking dish, then sprinkle with 1/2 of feta. Top with remaining pasta and feta, then bake in middle of oven, uncovered, until cheese is slightly melted and pasta is heated through, 10 to 15 minutes.

Thursday, February 7, 2008

Mini Banana Bread Loaves: An Exercise in Portion Control

I would consider myself skilled in various things, but portion control is not one of them. Hubby and I are on an Anti-Atkins diet, high carb movement: we go to restaurants and not only finish the bread basket, but ask for more. For kicks, try doing this in Miami where the waitress only looks at you quizzically, not sure whether you're joking and finally asks "you're not from around here, huh?!" Because of our lack of self-restraint, I've come to love my mini loaf pan. You get your own little loaf (since I never want to share my sweets), and after eating one, its at least satisfying enough to hold you out for the rest of the afternoon. Oh, and if anyone else uses a pan like this, please share your wisdom on how to clean it. It's stumped me for years. :)Mini Banana Bread LoavesThough I have a file full of banana bread recipes I would like to try out, I must sadly admit my pantry is nearly empty so i went with an old standby from Cooking Light. There's no bells and whistles to this recipe, but its quick and comes out delicious every time. When I can, I would LOVE to try this recipe from delicious days' blog.

But for now, here's the old classic.
*If you're wondering, the red speck above is from a loaf I experimented with blueberries added. I prefer without.
Classic Banana Bread
Ingredients
2 cups all-purpose flour
3/4 teaspoon baking soda
1/2 teaspoon salt
1 /2 cup granulated sugar
1/2 cup brown sugar
1/4 cup butter, softened
2 large eggs (I've substituted 2 egg whites and 1 whole egg)
1 1/2 cups mashed ripe banana (about 3 bananas)
1/3 cup plain or vanilla low-fat yogurt
1 teaspoon vanilla extract
1 teaspoon ground cinnamon
Cooking spray

DIRECTIONS
Preheat oven to 350°. Lightly spoon flour into dry measuring cups; level with a knife. Combine the flour, baking soda, and salt, stirring with a whisk.
Place sugar and butter in a large bowl, and beat with a mixer at medium speed until well blended (about 1 minute). Add the eggs, 1 at a time, beating well after each addition. Add banana, yogurt, and vanilla; beat until blended. Add flour mixture; beat at low speed just until moist. Spoon batter into an 8 1/2 x 4 1/2-inch loaf pan coated with cooking spray. Bake at 350° for 1 hour or until a wooden pick inserted in center comes out clean**. Cool 10 minutes in pan on a wire rack; remove from pan. Cool completely on wire rack.
**Kitchen Note: to make these into mini loaves, I baked at 350 for approximately 30-35 minutes.

Wednesday, February 6, 2008

Dress Up Your Wine

...literally. How absolutely adorable are these kimono wine holders? I received these as a gift and they instantly made me smile. The little man has a hair braid and his lady friend looks slender in her slim fitting 2 piece kimono. I am not sure where my gift giver purchased these but I did a quick search on google and found a similar (though not quite the same) item here. I can't find any with the man's beanie top, though!

I think these make adorable hostess gifts. imagine getting a bottle of wine in a kimono instead of the boring gift bags they're usually adorned in. I'm in love with his braid so I tried to take another picture. These really don't even do them justice.

Friday, February 1, 2008

Food and Family

How beautiful is this?!
I'm out of town for the week, so I haven't been able to post any recipes that I've made but I thought this would be an appropriate post with the upcoming Chinese New Year's on 2/7 - a celebration of family, new beginnings, and best of all- food.

In my family, serving food (in copious amounts!) has always been a sign of love, caring...and a good host. This has been so ingrained into my thinking that I cannot stand to have someone in my house that does not have a full belly! The photo above was taken during a family visit in Indonesia. Because we were visitors, it was only natural that we would be greeted with food gifts by all those stopping by to say hello. Needless to say, in those few weeks, I sampled more exotic desserts than my stomach could handle. Small desserts such as those in the photo are called "kue." Wikipedia provides more insight on these delightful treats:

the most common flavouring ingredients are coconut cream, grated coconut, pandan leaves and gula melaka or palm sugar.
While those make the flavor of kue, their base and texture are built on a group of starches – rice flour, glutinous rice flour, glutinous rice and tapioca. Two other common ingredients are tapioca flour and green bean (mung bean) flour (sometimes called "green pea flour" in certain recipes). They play a most important part in giving kue their distinctive soft, almost pudding-like, yet firm texture.

There are not too many Indonesian bakeries in the United States, although you can find Thai or Malaysian groceries often carry variations of kue. If you are adventurous, here's a picture of one of my favorite desserts that you can sometimes find in Asian grocery stores that carry fresh foods. Kue Lapis ("layered cake") is traditionally a steamed cake consisting of alternating layers - each layer is steamed separately for about 10 minutes! The green coloring usually comes from a pandan paste (or food coloring). While it's translated as 'cake' kue lapis tastes nothing like what you'd associate cake textures with. Rather, its somehow a cross between jello, pudding and tapioca balls :) As a child, I'd eat these strip by strip!