Sunday, December 28, 2008
Ginormously Delicious Chocolate Chip Cookies
As you can imagine, it feels good to be back home and getting back to a more normal eating schedule. I've increased the veggies in my diet, tried to return to running and limited myself to three meals a day (down from 5-6!) Even with my new healthy outlook, I certainly still make room for ginormous chocolate chip cookies.
After indulging in days of Momma's Asian delights, I had a hankering for good ol' chocolate chip cookies. I spent a few minutes drooling over Tastespotting's cookie gallery and settled on the cookies made by Easy Peasy. Her cookies looked huge, soft and well, perfect. I used mini chocolate chips (my new obsession) and about 1/4 cup of white chocolate chips to shake things up. Michelle measured out about 1/2 cup dough for each cookie. Wanting to have cookies to take to work (and prevent us from eating them all) I used a 1/4 cup of dough for each. My cookies were still huge!
I. Love. These. Cookies. These were so fabulous and sinful. If you're not feeling overindulged yet, I suggest you get yourself into the kitchen and make these. Dieting should be addressed after the New Year! :)
Enjoy the rest of the holidays!! It'll be sad when we get back to full work weeks, huh? :)
Giant Chewy Chocolate Chip Cookies
Adapted from Easy Peasy
2 cups plus 2 Tbsp all-purpose flour
1/2 tsp baking soda
1/2 tsp salt
1/2 tsp ground cinnamon (we all know cinnamon makes everything better!)
12 Tbsp (1 1/2 sticks) unsalted butter, melted cooled until warm
1 c brown sugar, packed
1/2 c granulated sugar
1 large egg plus 1 yolk
2 tsp vanilla extract
1 cup mini semisweet chocolate chip
1/4 cup white chocolate chips
Directions
1. Heat oven to 325 degrees. Line cookie sheets with parchment paper.
2. Whisk dry ingredients together; set aside.
3. With electric mixer, beat butter & sugars until thoroughly combined.
4. Beat in egg, yolk and vanilla until just combined.
5. Add dry ingredients; beat at low speed until combined. Stir in chips.
6. Measure 1/4 cup of dough and roll into ball. Holding dough ball in fingertips of both hands, pull into 2 equal halves. Place dough halves together, ragged side up. Place formed dough onto cookie sheet with about 2 inches in between (the cookies will spread).
7. Bake, reversing position of cookie sheets halfway through baking, until cookies are light golden brown and outer edges start to harden yet centers are still soft and puffy.
8. Cool cookies on sheets until able to lift without breaking and place on wire rack to cool.
Monday, December 22, 2008
Christmas Iced Lemon Rounds
Perusing through Christmas Cookies: 50 Recipes to Treasure for the Holiday Season really left me drooling. Among Viennese Crescents, Baci Brownies (with a Nutella swirl!), and Swedish Dreams, I wasn't quite sure how I'd pick a recipe for my Christmas party until I came across these Iced Lemon Rounds. Though not the most Christmasy of cookies, I had all of the very simple ingredients and alas, my decision was made!
These cookies are buttery, lemony, tender and sweet. Though they may not be your typical holiday cookie, you'll love how easily they come together. I'd say the Iced Lemon Rounds are a perfect solution for a last minute treat. Sprinkle some green or red crystal sugar on the tops and you have yourself a festive cookie! Hubby argued against this with the thinking that holiday sprinkles just don't go with lemon. OK. You decide :)
These were a big hit and we didn't have any leftovers. The original recipe states these make 47 cookies. Not wanting to roll and scoop dough all day, I only made a half recipe but ended up with about 15 cookies.
Thanks again for the great book, Katie!
Iced Lemon Rounds
Courtesy of Christmas Cookies: 50 Recipes to Treasure for the Holiday Season
3 cups all-purpose flour
1 teaspoon baking powder
1/2 teaspoon salt
2 sticks (16 tbsp) butter, softened
1/2 cup granulated sugar
1/2 cup confectioners' sugar
2 large eggs
2 tablespoons finely grated lemon zest
1/4 cup fresh lemon juice
1 teaspoon pure vanilla extract
Lemon Icing
1 cup confectioners' sugar
1 tablespoon fresh lemon juice
2 teaspoons milk
1. Preheat oven to 350 degrees. Line a cookie sheet with parchment paper.
2. Whisk together flour, baking powder, and salt in a small bowl.
3. Beat softened butter in a mixing bowl until creamy. Add sugars and beat until smooth. Beat in eggs, followed by lemon zest, lemon juice and vanilla. Gradually add in flour and mix until just incoporated.
4. Scoop about a tablespoonful of dough and roll with your hands into a ball. Place on the cookie sheet and flatten to about 1/2 inch thickness.
5. Bake for about 13-15 minutes until cookies are pale on top but golden on the bottom. Allow to cool on a wire rack completely.
6. To make the icing, whisk the confectioners' sugar, lemon juice and milk until combined. Spread the icing on the cooled cookies with a table knife. Let the cookies stand on rack until icing sets.
Monday, December 15, 2008
Pumpkin 'n Spice Cinnamon Streusel Buns
I have a whole bevvy of pumpkin recipes to share, but in between the sweet potato buttermilk rolls, homemade apple butter, and somewhat orangish turkey soup I didn't want anyone to get the idea that I was obsessed with orange foods. Quite the contrary - orange is my least favorite candy flavor. Hmm, though maybe one of my favorite fruits. I'm so confusing.
In any case, I made these delectable cinnamon rolls for our breakfast last weekend. They're warm, gooey, not to sweet and full of spice (as a result of adding lots o' cinnamon to the filling and dough!).
These are much easier than a previous Ooey Gooey Cinnamon Roll recipe I posted, though they're not nearly as sinful. This is a lightened recipe that gets the job done and satiates a cinnamon bun hunger, but if you're really looking to ward off the health insurance companies, try this guy.
Oh, and if you're anything like me and also looking to use up some pumpkin, this recipe only uses a 1/4 cup. Guess I'll just have to make some more desserts!
Check out Yeastspotting for some great inspiration!
Pumpkin 'n Spice Cinnamon Rolls
Adapted from Cooking Light
1 package dry yeast (about 2 1/4 teaspoons)
1/4 cup warm water (100° to 110°)
3 3/4 cups all-purpose flour, divided
1/2 cup pumpkin, room temperature
1/2 cup milk, room temperature
1/4 cup butter, melted and slightly cooled
2 tablespoon granulated sugar
1 1/4 teaspoons salt
1/2 teaspoon pumpkin pie spice
1 teaspoon ground cinnamon
Nonstick Cooking spray
3 tablespoons granulated sugar
3 tablespoons brown sugar
2 tablespoons all-purpose flour
1 1/2 heaping teaspoons ground cinnamon
2 tablespoons chilled butter, cut into small pieces
Glaze:
3/4 cup sifted powdered sugar
1/4 cup hot water
1/4 teaspoon vanilla extract
To prepare the buns, dissolve yeast in warm water in a large mixing bowl; let stand for 5 minutes. Lightly spoon flour into dry measuring cups, and level with a knife. Add 3 cups flour, pumpkin, milk, butter, sugar, salt, and spices; beat with a mixer at medium speed until smooth. If using a Kitchenaid, knead with a dough hook until smooth and elastic (about 10 minutes); while kneading, add enough of the remaining 3/4 cup flour, 1 tablespoon at a time, to prevent dough from sticking to hands (dough will feel tacky). Otherwise, knead by hand on a lightly floured surface.
Place the dough in a large bowl coated with cooking spray, turning to coat top. Cover and let rise in a warm place , free from drafts for approximately 1 hour or until doubled in size. Press two fingers into the dough. If an indentation remains, the dough has risen enough.
Combine 3 tablespoons granulated sugar, brown sugar, 2 tablespoons flour, and 1 1/2 teaspoons cinnamon in a small bowl. Cut in butter with a pastry blender or 2 knives until mixture resembles coarse meal.
Punch dough down; cover and let rest for 5 minutes. Roll the dough into a 12 x 10-inch rectangle on a floured surface. Sprinkle with brown sugar mixture. Roll up the rectangle tightly, starting with a long edge, pressing firmly to eliminate air pockets; pinch seam and ends to seal. Cut roll into 12 (1-inch) slices. Place slices in a 9-inch square baking pan coated with cooking spray. Cover and let rise 25 minutes or until doubled in size.
Preheat oven to 375°.
Bake the rolls at 375° for 20-25 minutes or until golden brown. Cool for 15 minutes in pan on a wire rack.
To prepare the glaze, combine the powdered sugar, vanilla extract and 1 tablespoon of water in a small bowl, stirring with a whisk. Add water 1 tablespoon at a time, whisking in between until smooth. Drizzle glaze over buns. Serve warm.
Sunday, December 14, 2008
Amish Friendship Bread...Revealed!
Alexandra asked if I had the recipe for the starter and I sadly let her know that I didn't. The premise of the Amish Friendship Starter is that only the Amish know how to "start" it so you must receive it from a friend. Well, I'm 99.9% sure that a nice Amish lady wasn't the originator of the starter I received, but well...I suppose you never know.
Fast forward a couple of days, and I fortuitously happened upon a Friendship Starter Cookbook at our library's book sale. I couldn't believe it! Now I have a whole bevy of recipes to bake with my starter.
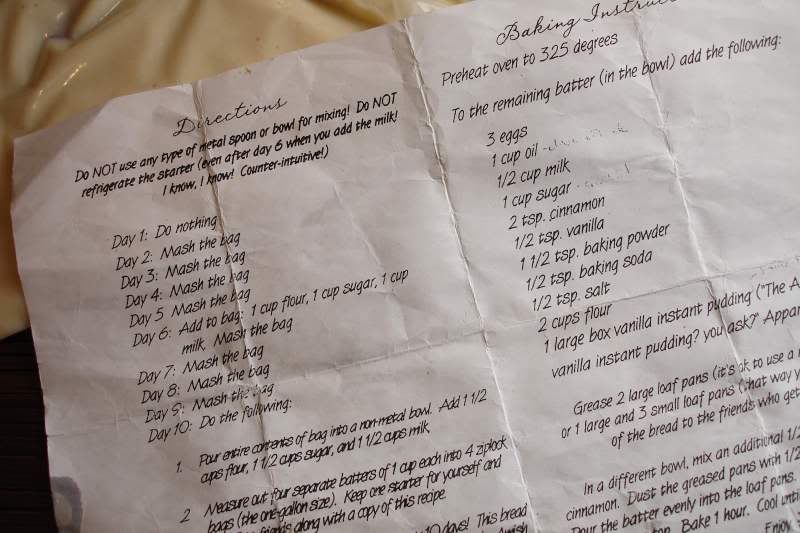
And without further adieu, here's the recipe for the Amish Starter:
Since I received my starter from my niece, I can't guarantee this recipe, though I'd like to give it a try. I'll be sure to post the results of any other baked goods I experiment with. Finally, here's the recipe and "feeding" instructions for your starter:
Starter Feeding Directions
DO NOT use any type of metal spoon or bowl for mixing. Don't refrigerate the starter
Day 1: Do Nothing
Day 2: Mash the Bag
Day 3: Mash the Bag
Day 4: Mash the Bag
Day 5: Mash the Bag
Day 6: Add to bag: 1 cup flour, 1 cup sugar, 1 cup milk. Mash the bag.
Day 7: Mash the Bag
Day 8: Mash the Bag
Day 9: Mash the Bag
Day 10: Do the following:
Pour entire contents of bag into a non metal bowl. Add 1.5 cups flour, 1.5 cups sugar and 1.5 cups milk.
Measure out four separate batters of 1 cup each into gallon size ziploc bags. Keep one starter for yourself and give the other 3 to your friends, along with a copy of the recipe.
Cinnamon Amish Friendship Bread
Preheat oven to 325 degrees.
To the remaining batter in the bowl (we measured about 2 cups) add:
3 eggs
1 cup oil
1/2 cup milk
1 cup sugar
2 tsp cinnamon
1 tsp vanilla
1 1/2 tsp baking powder
1/2 tsp baking soda
1/2 tsp salt
2 cups flour
1 large box vanilla instant pudding
Grease 2 large loaf pans or 1 large and 3 small loaf pans.
In a small bowl, mix an additional 1/2 cup sugar and 1/2 tsp cinnamon. Dust the greased pans with 1/2 the cinnamon/sugar mixture. Pour the batter evenly into the loaf pans. Sprinkle the remaining mixture on top. Bake 1 hour. Cool.
Look at the other fabulous vintage cookbooks I found at the library sale. The sale consisted of all the books you can fit into a bag for a dollar! What else can you buy for a dollar these days?
Oh, and look at Betty Crocker's makeover:
Hope you had a good weekend!
Tuesday, December 9, 2008
Free to a Good Home!
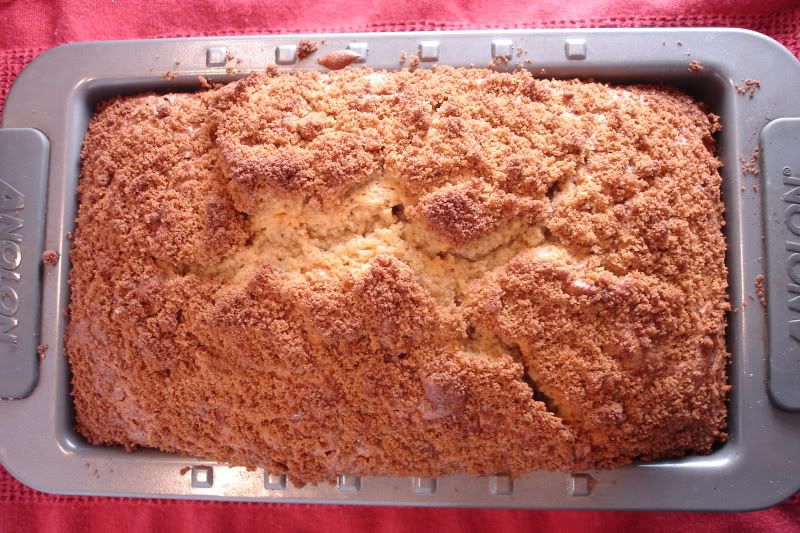
Like the chain letter of breads, Amish Friendship Bread is a great bread for the holidays or to coerce your friends into baking. It's also wonderful if you're a lover of cinnamon, sugar, or streusel toppings (pointing a finger at myself). After caring for & feeding your starter for about 10 days, you quadruple it, divide it up and bake yourself a ridiculously good cinnamon coffeecake type bread. You can bake several small loaves but we decided to make one ginormous cinnamon monstrosity. Pass along the starter to friends and the chain continues. It's all good fun until you use up all your precious baking supplies. This project requires a lot of flour and sugar!
** The giveaway is closed, but click here for a recipe to make your own***
If you'd like to be a recipient, just leave a comment by tomorrow morning (Wednesday). I have a few of these to give out. Just for kicks, let me know your favorite dessert to pass along to friends!
I believe there are other uses for Amish starter. I'll experiment and keep you posted!
Sunday, December 7, 2008
Creamy Mexican Turkey Soup
I sometimes have to ask myself what I'd do without my fellow bloggers. For one, I didn't realize I was paying such exorbitant prices for my TP. Thank you, my friends for alerting me to the fact that I may be the only sucker in the country buying those $15 six roll multipacks. I'm usually a better bargain hunter, I swear.
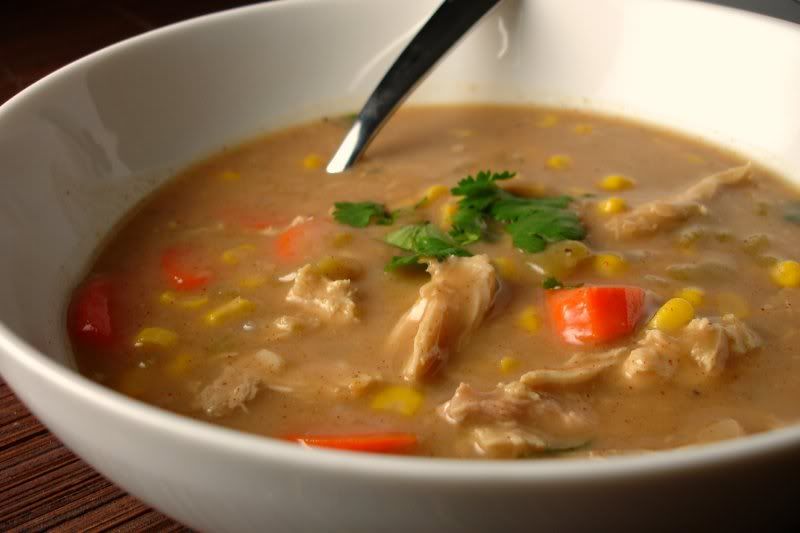
Secondly, I'd probably be serving us plates of boring leftover turkey night after night if I hadn't seen all of your inventive uses. Take for example, Lori's Creamy Mexican Turkey Soup chock full of corn, green chilies, carrots and cilantro. See how creamy it is? There's no cream in the soup! I give Lori (the Recipe Girl) all the credit - she's a genius!
This soup is nicely spiced, filling and easy to throw together. I can't wait to make the soup again though I may try with chicken and perhaps add some rice.
Creamy Mexican Turkey Soup
Courtesy of The Recipe Girl
1 Tbs vegetable oil
1 large carrot, chopped
1 stalk celery, chopped (I omitted)
1 cup chopped yellow onion
2 cloves garlic, minced
3 cups chicken or turkey stock or broth
1 can diced green chilies, drained
2 cups milk
¼ cup all-purpose flour
1 tsp salt
1 tsp chili powder
½ tsp ground cumin
2 cups shredded turkey
¾ cup corn, fresh or frozen
3 Tbs chopped fresh cilantro
1 cup grated Monterey Jack cheese (only used 1/4 cup b/c that's all I had left!)
1. In a large stockpot, heat oil over medium-high heat. Add vegetables and garlic and sauté for 5 minutes. Add broth and bring to a boil. Reduce heat to medium-low and simmer, covered, for about 10 minutes. Add chiles.
2. In a bowl, whisk together milk, flour, salt, chili powder and cumin. Increase heat to high and whisk milk mixture into soup. Stir until thick and bubbly, about five minutes. Reduce heat to low. Add turkey, corn, cilantro and cheese; stir until cheese is melted and soup is hot, 5 to 10 minutes.
Monday, December 1, 2008
Sweet Potato Buttermilk Dinner Rolls
Well, in the spirit of penny pinching and today's earth shattering confirmation of our recession, here's a great way to use up all those leftover sweet potatoes from Thanksgiving's sweet potato pie. I found this fabulous recipe on Nicole's Pinch My Salt, an equally fabulous blog full of mouth watering goods.
These Sweet Potato Buttermilk Rolls are gorgeously colorful, fluffy and (believe me) easy to make. Oh, and they're delicious too. What more could you want from your carbs??
Nutrition, of course. Packed with sweet potato's vitamin A, you've got yourself a healthy carb to feel good about & enjoy with all that turkey haunting your refrigerator.
The rolls keep pretty well, and we have been making turkey sammies daily since Thanksgiving. Since Nicole does such a wonderful job with the recipe and is so kind and talented to provide step by step photos, I'll just send you over to her for my new favorite bread recipe. I almost didn't change a thing, but decided to add a little more sugar than 1/4 cup.
After allowing to rest for a mere hour, the dough easily doubles. Make sure it's ready by poking two fingers and making sure the indentation doesn't go anywhere (tip courtesy of Nicole).
Shape into an a round ball and cut dough into equal portions. Roll into cute balls.
Sprinkle with flour and bake until golden brown!
The rolls keep pretty well but taste amazing when popped into the toaster oven for a few minutes. For anyone still tentative on baking with yeast, I used the sometimes hard to find SAF Perfect Rise yeast. It doesn't require proofing and has never failed me. I can sometimes find it at Trader Joe's though they'll have it one day and the next they won't!
For more tasty bread inspirations, visit Yeastspotting!