Tuesday, July 29, 2008

Turkey Feta Pizzas & More DC Happenings

More on this guy later...

Every couple should be forced to spend at least one summer in a studio with no TV. Hubby and I have been more active than we ever could have imagined. Gone are the lazy Saturdays of San Diego, spent lounging in bed all morning, then rolling out of bed to lay a little bit longer on the beach. We've been out and about and DC's great (free) museums have something to do with that. First off, can anyone tell me what's the name of this tree? They're everywhere and absolutely gorgeous.

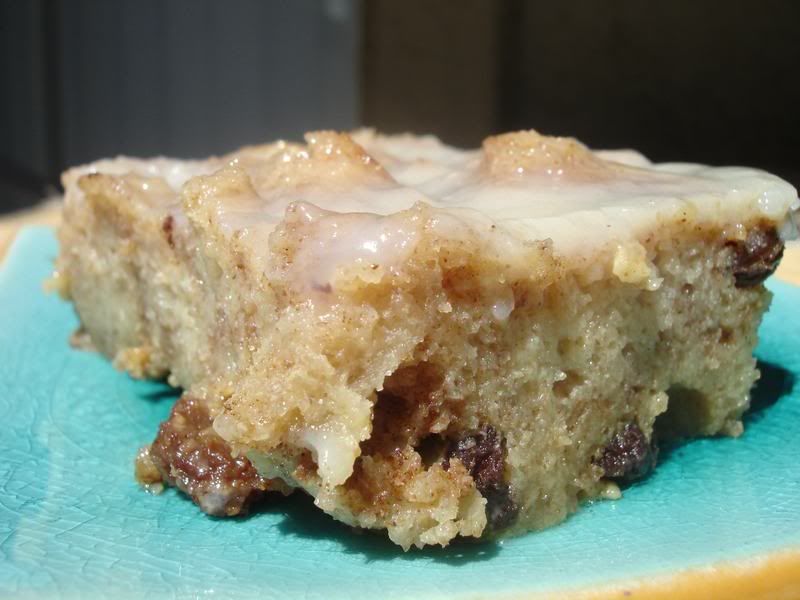
This Saturday, we visited the US Botanic Gardens to mourn my lovely garden that has surely died of neglect in my absence. We were a little weary of the Botanic Gardens as D.C.'s heat makes for a little bit of a bloodbath and the last thing we needed was to be subjected to any junglesque greenhouse temperatures. I was delighted to see that one of the first exhibits was not only air conditioned, but featured "The Aroma of Food and Drink," showcasing exotic and native spices and plants that go into many of the foods we enjoy. Best of all (well, second to the air conditioning), you could get up close and take a whiff of the spices. Of course, vanilla smelled so good and the thought of French Vanilla Ice Cream was more than I could handle at the time.


Could this place get any better? The orchid exhibit was next, displaying my all time favorite flowers and the main flower of our wedding. See those beauts up top in the banner? That's our wedding cake!


After too much fun for one day, we hiked to the Metro & came home to pass out after all this excitement.

Once I awoke from my nap, I got working on our dinner. A wife's work is never done, huh? :)This treat was inspired by none other than Elle from Elle's New England Kitchen. There are a lot of great blogs out there, so I'd be hard pressed to choose a favorite, but if some crazy man demanded that I choose one or else, I'd say Elle's is definitely up there.

From the moment I saw Elle's post about Turkish Pizzas, I knew that the recipe would hijack all the others on my burgeoning 'to-make' recipe list, and take top spot. Boy, am I glad that these pizzas made it to the top. This was easily one of my favorite recipes to date and I can't wait to have these again.

I followed Elle's recipe for the dough, though I added a 1/2 tsp of garlic powder to the flour. Garlic makes everything better, don't ya think? The crust came out perfectly soft on the inside with a slight crisp on the outside. Fluffy bread like this is the stuff of dreams for carb-a-holics like us.


For the filling, I went ahead and used ground turkey since I purchased a package on sale, and cooked it directly with the spices and other ingredients instead of cooking them seperately. I also added diced red pepper, cilantro, cinnamon, red pepper flakes and a dash of lemon juice to the mixture because I'm crazy like that. Elle mentions in her post that the original recipe suggests feta as an optional add-on, but I would say do not skip the feta as it definitely makes the filling!

This smelled so good while cooking that we couldn't wait to take pictures. The pics were snapped in a little bit of a starvation-half tired from a nap-too much activity for one day-frenzy so pardon if they're a teensy bit of out of focus. I served the pizzas with a side of coucous and we were in heaven...once I put the camera away.

Turkey Feta Pizzas
Adapted from Elle's New England Kitchen & Oriental Basics

Elle's dough recipe (I added 1/2 tsp garlic powder)

Filling:
1/2 large sweet onion, finely diced
1/2 cup red bell pepper, finely diced
2 garlic cloves, minced
1 tbsp olive oil
1 pound lean ground turkey
1/2 cup chopped & seeded tomato
2 tsp tomato paste
2 tsp sweet paprika
1/2 tsp ground cinnamon
1/2 tsp cumin
1/8 tsp red pepper flakes
Kosher salt and pepper
4-5 oz crumbled feta
1/4 cup chopped cilantro (optional)
half of a lemon


1. Heat oven to 450°.
2. Heat a large wok over medium high heat. Heat the oil and saute the onions until they begin to soften, about 3-4 minutes. Add red pepper and garlic and saute for an additional 2-3 minutes, or until red pepper begins to soften. Add diced tomatoes and saute 1-2 minutes. Push the veggies to the side of the wok.
3. Add a bit of oil to the skillet if needed, then saute the meat until barely pink. Mix veggies into turkey and add tomato paste and spices. Mix until incorporated. Remove from heat and add feta. Taste and adjust seasonings.
4. Divide dough into 8 portions and roll out to thin circles. Line 2 baking sheets with parchment, and place 4 dough circles on each one. Spread some of the topping on the first 4, then put the baking sheet in the oven. Have 1/2 cup of cold water ready, and toss it in the bottom of the oven quickly, then shut the door.Bake for 8-10 minutes. Repeat with last 4 pieces of dough. Remove from pan to a cooling rack. Sprinkle with chopped cilantro & lemon juice.

Thursday, July 24, 2008

Muffin Lady Update & Chicken Salad Sammies

Another day, another muffin. I promise this is the last muffin post for awhile, and for those sick of 'em (you crazy fool, you), I have another quick treat down below.

Thanks to everyone for sending me recipes. You've successfully fed into my muffin making obsession and I will be making them shortly once I recover from this muffin binge. I'm sure it won't take long. I recover quickly, thank God.

I made yet another batch of Raisin Bran muffins and think I like 'em better. These banana filled babies received an A+ on the day-after dryness test. I'm not sure if its the added fat from the butter or the moisture from the mashed bananas, but these do not remind me of the dry bran muffins I'm used to!


Here's the recipe I modified from the Kellogg's website for any of you gettin' rid of your cereal. Kristal, I know. It's blasphemy :) Because I have no mixer in the studio, I first melted the butter as opposed to creaming it with a mixer. Even if I did have my beloved KitchenAid, I think I like this low maintenance method -- one less thing to wash!

Banana Bran Muffins

A batch of Bran Muffins that stay moist after the ...

See Banana Bran Muffins on Key Ingredient.

Ok, on to life beyond muffins!

I made this chicken salad sammy for hubby's lunch today. He seemed to find it strange that I stopped to take photos as he was waiting to leave for work, but I've gotta show off my creations, right? I never use a hard and fast recipe when making chicken salad, so if you'd like some better guidance try visiting Picky Palate or The Pioneer Woman who are much better teachers than me on this short attention span Friday.

My version starts with a poached chicken breast. It's up to you whether you prefer to dice or shred your chicken. Personally, I like my chicken shredded as diced chicken sometimes reminds me of the bad pasta or chicken salads that use pre-fab processed chicken chunks. Yuck.

The dressing consists of nothing fancier than a little Hellman's mayo, lemon juice, spicy brown mustard, Kosher salt & fresh ground pepper, diced red peppers, and green grapes (cut in half). I season as I go so its hard to give exact measurements. I often cook as my mom taught me - just wing it!

Top your chicken salad with some cucumbers & spinach and you're on your way to a healthy lunch! Have a great weekend.

Help a Manic Muffin Lady

DC is wonderful, but I'm starting to miss the luxuries of home: my trusty red Kitchenaid mixer, a toaster oven, my Calphalon pans, oh and of course, my bed. Nothing's better than your own bed, dont ya think? Because the college kid has no other baking tools beyond a muffin pan, I have been well, baking a lot of muffins to satisfy my need for baking. When I get back home, I've already compiled a list of quick breads, yeast rolls and cornbread that I'm dying to make.

Today's muffins come as a courtesy of our cereal addiction. When cereal is on sale, I cannot pass it up and as a result, we have more cereal boxes than living space in the studio right now. How two people can devour 5 boxes of cereal is really beyond me. In an attempt to clear out the pantry, I went after my least favorite cereal,Raisin Bran and tried to repurpose it as muffins.


Raisin Bran cereal is soaked in a milk mixture along with molasses, brown sugar, oil and an egg. To boost the 'excitement' factor of sometimes blah bran muffins, I added cinnamon, chopped apples and extra raisins to the batter.

These were delightful straight out of the oven - warm & fluffy. A day later, the muffins were still good but a little bit on the dry side - nothing a quick 5 second nuke in the microwave didn't fix. Is this just the nature of bran muffins? I seem to have run into this day-old dry-bran muffins dillema many a time - they're never quite the same the 2nd day around.

Readers, please help! I need to get rid of this box of Raisin Bran. Do you have any tried & true Raisin Bran or bran muffin recipes to share? Something that doesn't dry out the next day? If so, please share!

In the meantime, here's my recipe. I'd suggest gobbling these guys up on the day you make them. Making half of a recipe always helps as well.

Molasses Apple Raisin Bran Muffins (Low Fat)

2 cups Raisin Bran cereal
handful of extra raisins (use your judgement. My cereal didn't have enough raisins)
1/2 of an apple, cored, peeled & diced
3/4 cup milk
1 extra large egg, slightly beaten
1/4 cup packed brown sugar
1/4 cup molasses
1 teaspoon vanilla
2 tablespoons canola oil
1 cup all purpose flour
1 teaspoon baking powder
1/2 teaspoon baking soda
1/2 teaspoon ground cinnamon
pinch of salt

1. Preheat oven to 375 degrees. Grease or line 12 muffin cups with muffin cups liners. In a medium bowl, whisk milk, egg, brown sugar, vanilla, molasses and oil in a bowl until combined. Stir in cereal, raisins and apple. Allow to stand for 10 minutes.

2. Stir cereal mixture again to break up cereal. Combine flour, baking powder, baking soda, cinnamon and pinch of salt in a large bowl. Make a well in the center and add cereal mixture. Stir until just combined and divide batter among muffin cups. Bake 20 minutes or until toothpick comes out of center clean.

Makes 12 muffins.

Wednesday, July 23, 2008

Some Tunes to Carry You Over the Hump

It's Wednesday, folks. Hump Day to be exact. Only two more days till we can all enjoy frosty cold beverages and forget about the week's woes (that is, if you have any). Need inspiration? Check this cool yummy. Ooh, or this one while you're at it.

By Wednesday, I'm usually fretting about all the things I haven't done and still need to get done. The blog's no different. I'm officially a slacker. I've been tagged for several memes by Grace from A Southern Grace, Bridgett from La Bella Cook and Diva from the Sugar Bar. Sorry for the delay, I'm still trying to scrounge up all those funny & interesting tidbits about myself.

Meanwhile, Emiline from Visions of a Sugar Plum has tagged me for a music meme. Requiring little thought, I easily crossed this one off my to-do list. I love music! ...not saying that I don't love facts about myself, but you get the point :) So, if any of you are procrastinating as well, check out my tunes and those fabulous ladies' blogs.
Here's the rules:

List seven songs you are into right now. No matter what the genre, whether they have words, or even if they’re not any good, but they must be songs you’re really enjoying now, shaping your summer (or whatever season). Post these instructions in your blog along with your 7 songs. Then tag 7 other people to see what they’re listening to.


{Breakdown by Jack Johnson Featuring Handsome Boy Modeling School}


{Lucky by Jason Mraz Featuring Colbie Caillat}


{Free Fallin by John Mayer} for some reason I love cover songs...


{Breathe Me by Sia}


{Star Mile by Joshua Radin}


{Hide and Seek by Imogen Heap}


{Southern Girl by Amos Lee}


If you love music & haven't done this meme, consider yourself tagged!

Monday, July 21, 2008

Protein Mania: Summer Black Bean Quinoa Salad

Since the temperatures were once again above the 90s, we spent our weekend as tourists, hopping from one air conditioned museum to the next. As you may know, Washington, D.C. has an amazing collection of sprawling & ornate buildings, war and presidential monuments and a museums for just about any topic you could think of. Probably most famous is the collection of 19 museums of the Smithsonian Institution.


{Photo Courtesy of Edweek.org}

One of my favorite museums of the day was the National Museum of the American Indian, housed in an absolutely stunning building pictured above. Among the exhibits portraying the past & present life of Indians (Northern and Southern American) I of course, was particularly interested in the lifestyle, food and cooking artifacts.

Though certainly trendy at the moment, I learned that tiny quinoa once served as a staple food for the Ancient Incas, powering their armies and sustaining their communities as one of the three food staples (along with potato and corn). Historians believe the Incas worshiped quinoa as a sacred plant and deemed it "the mother grain." In today's world, quinoa provides a nutritional bouquet of vitamins, protein and contains all of the essential amino acids the human body needs. In fact, quinoa provides up to 16.2% of the daily recommended protein and more calcium than a glass of milk! Paired with black beans, you have yourself quite a protein combo.


Inspired by our trip, I decided to make some quinoa and have a taste of this ancient grain (which technically is not a grain, but a seed). I know, I'm probably one of the last food bloggers to try quinoa, but now is better than never, right? Overwhelmed by the amount of recipes available, I followed a cooking technique outlined by Gourmet Magazine that calls for the quinoa grains to first be boiled, then steamed in a fine sieve. Note to all novices, um...if you have a plastic sieve, you might want to re-think this step before proceeding. Um, not that I did this or anything.


I added red peppers and cucumbers to the original recipe to make for a very colorful and hearty salad, perfect for the summertime. I also halved the amount of butter and oil to cut down on fat and still think this was delicious. Quinoa has a similarity to couscous and for its nutritional value & ease in cooking, I will definitely be making it again and again. Once I decide to like something, it'll be on our menu for quite awhile :)

For those of you who like to be in the know, quinoa is pronounced "KEEN-wah," not "Que-in-oahh" as some near and dear to my heart like to say.

Since this salad is a protein-rich, low fat 'superfood' I'm sending this recipe over to the Healthy Cooking event hosted by Fun and Food and also the One D (One Dish) Salads roundup hosted by Archana's Kitchen.

As a last note, if you do visit the National American Indian Museum or any of the museums in the Mall, take a pit stop at the Mitsitam Cafe where you can be treated to quinoa. The Cafe boasts native cuisine from the Northern Woodlands, South America, Meso America, the Great Plains, and the Northwest Coast and Columbia Plateau. The food is delicious and a unique treat!

Summer Black Bean Quinoa Salad
Adapted from Gourmet Magazine, July 2007
1 cup uncooked quinoa
2 teaspoons grated lime zest
2 tablespoons fresh lime juice
pat of butter, melted (use a tablespoon if you dare!)
1 tablespoon olive oil
1 teaspoon sugar
1 can (14.5 oz) black beans, drained & rinsed
1/4 cup diced red pepper
1/4 cup seeded & diced cucumber
1 roma tomato, chopped
1/4 cup fresh chopped cilantro

1. Rinse quinoa in a fine sieve, rubbing grains and washing until water runs clear. Do not skip this step as unwashed quinoa is bitter.

2. Cook quinoa in a medium saucepan of salted boiling water, uncovered for 10 minutes. Drain quinoa in sieve. Place about 1-2 inches of water in sauce pan and heat until simmering. Place sieve over pot and cover with dish towel & lid. Steam for about 10 minutes. Remove pot from heat and remove lid. Let stand, covered with dish towel for about 5 minutes. Put pat of butter in pot and set aside to melt.

3. Whisk together lime zest, juice, olive oil & sugar. Add red peppers, black beans and tomato to warm pot. Drizzle with the lime mixture and toss gently. Add cilantro and drained quinoa. Fluff with a fork to combine. Cover with lid and allow to sit for 30 minutes.

Wednesday, July 16, 2008

Blueberry Dishwasher Muffins

Don't Blink....

Blueberry Dishwasher Muffins
Yes, you really are seeing blueberry muffins in a dishwasher. See, I mentioned in my last post that I've been spending time in DC. I suppose what I didn't explain is that I'm visiting DC while hubby is working here for the summer and subletting a studio apartment from a college student...

Now, think back on your college days. I don't know about you, but my most sophisticated kitchen tool in college was probably the hand held mixer my mom told me I'd absolutely need one day. She received the mixer as a gift when she got married. Not to date my lovely mom, but that was a long time ago. That thing was ancient.

Blueberry Muffins
Now, just imagine the tools I'm dealing with in this college kitchen. Living here has been quite the adventure. There are no mixing bowls, 1-2 pots, no baking dishes (except for a crusty muffin pan), and not even an ancient hand held mixer in sight. I've become creative as of late, using a huge stock pot to mix the dry ingredients and Tupperware to mix the wet ingredients for these muffins.

Of course, when it came time to cooling the muffins, I improvised and used the dishwasher racks. Don't worry, they were clean. Blueberry Muffins
In any case, I made two batches of muffins: one using sour cream, the other using a mixture of sour cream and blueberry yogurt and a spritz of lemon zest. I also experimented with adding a brown sugar cinnamon streusel to the tops of some. The verdict in this 2-people-living-in-a stuido-with-no-kitchen-tools household? The blueberry yogurt & sour cream muffins with streusel topping were the best. They also came out a bit darker than the ones pictured above.

Blueberry Muffins
Oh, and if you were wondering. I caved. It may be too hot to cook, but its never too hot for blueberry muffins. Living in a studio will remind you to use the oven sparingly, though.

For those of you slumming it like me, this recipe requires no ancient hand mixer. Lucky you!

Best Blueberry Yogurt Muffins

2 cups unbleached all-purpose flour
1 tablespoon baking powder
1/2 teaspoon table salt
1 large egg
1 cup granulated sugar (7 ounces)
4 tablespoons unsalted butter , melted and cooled
3/4 cup sour cream
6 oz container of blueberry yogurt
1 1/4 cups blueberries
3/4 cup granulated sugar
1 teaspoon lemon zest

1. Heat oven to 350 degrees. Spray muffin tin with nonstick cooking spray.

2. Whisk flour, baking powder, and salt in medium bowl (or huge stock pot if you have to!) until combined. Whisk egg in second medium bowl (aka Tupperware) until well-combined and light-colored, about 20 seconds. Add sugar and whisk vigorously until thick; add melted butter in batches, whisking to combine after each addition. Add sour cream and yogurt in batches, whisking just until combined. Stir in lemon zest.

3. Add blueberries to dry ingredients and gently toss to combine. Add sour cream mixture and fold with rubber spatula until batter comes together and berries are evenly distributed, 25 to 30 seconds (small spots of flour may remain and batter will be thick). Do not overmix.

4. Use ice cream scoop or large spoon to drop batter into greased muffin tin. Bake until light golden brown and toothpick or skewer inserted into center of muffin comes out clean, 25 to 30 minutes, rotating pan from front to back halfway through baking time. Invert muffins onto wire rack, stand muffins upright, and cool 5 minutes.

Runner up Blueberry Muffins
source: He who must not be named.

If you are curious, read a little more here.

Check out the Weekend Breakfast Blogging Roundup at Monsoon Spice featuring summer fruits & veggies!
Photobucket

Monday, July 14, 2008

Too Hot to Cook?

It's officially blazing...Summertime is in full effect! I've been spending some quality time in our nation's capital and the humidity here is slowly killing me. The cool summer breezes of San Diego feel like a distant, fond memory and I'm beginning to have dreams that I'm trapped in a sauna. Have you ever seen the movie A Time To Kill where Ashley Judd spends a considerable amount of the movie sweating? Well, that's me but I don't quite pull off the sexy sweaty look as well as Ashley.


This past weekend, a quick jog through the park turned into a sweaty, cardio attack on my body. I say 'attack' as the combination of steep hills, blazing sunshine and opressive humidity made my body think that I was launching an assault on myself. Though I consider myself to be in fairly good shape, I suppose I'm not in DC shape. Though I used to easily run 5-6 miles a day, somehow I can barely eek out about 4 these days.

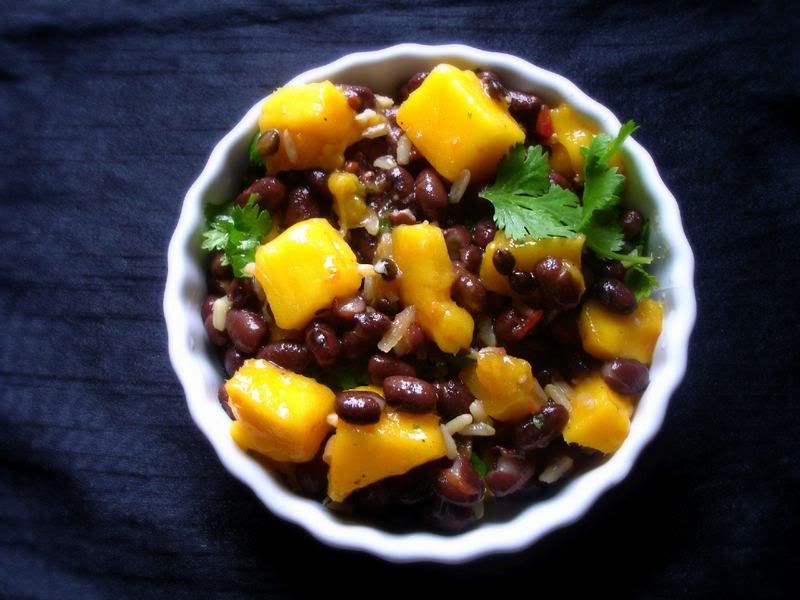
Alright, enough crying & complaining for now. For those of you who are equally trapped in miserable heat, here's a quick & refreshing side dish that I've begun to enjoy for lunch. It's quite a nutritional powerhouse and I am happy to report that you won't break into a sweat while making this Mango & Black Bean Salad. This also pairs well with fish and shrimp dishes if you're brave enough to turn on your stove or oven!

Because this is a healthy little treat, I'm submitting this to Cate's ARF/5-A-Day roundup at her lovely site, Sweetnicks. Check out her roundup every Tuesday for some healthy inspiration.

Beat the Heat Mango & Black Bean Salad
Adapted from Cooking Light
1 1/2 cups chopped, ripe mango
1/2 cup cooked wild rice
3 tablespoons chopped fresh cilantro
2 tablespoons fresh salsa (I used peach mango salsa)
2 tablespoons fresh lime juice
1 tablespoon extra virgin olive oil
3/4 teaspoon Kosher salt
1/4 teaspoon freshly ground black pepper
1/8 teaspoon red pepper flakes (use more if you like heat)
1 15 oz. can black beans, drained & rinsed

Combine all ingredients in a large bowl. Toss gently to mix.

Print the recipe here:

Mango & Black Bean Salad

See Mango & Black Bean Salad on Key Ingredient.

Friday, July 11, 2008

Moroccan Spiced Chicken with Saffron Coucous

Moroccan Spiced ChickenI'd like to put a disclaimer out there that this dish is probably not authentically Moroccan in any way. Because of poor planning and evening commitments, I had to bastardize this guy to fit my needs. Though the original calls for apricots, I had none and used raisins. The chickpeas I thought were in my pantry were somehow missing so I left those out. I added cannellini beans to the leftovers, and would highly suggest these as an alternative. Lastly, the original calls for a whole chicken. I imagine bone-in chicken would be delicious, but since I was cooking for one, I used boneless skinless chicken. I like leftovers, but not sure about a whole chicken. Lots of changes made on the fly, huh? Thankfully, this turned out delicious and full of flavor. Cinnamon and the sweet raisins offset the spiciness from the red pepper while simmering the chicken in the spices results in juicy and tender meat.

Since the couscous calls for raisins, the raisins in the chicken dish may be overkill for some. I love them, so didn't mind the extras. If you decide to make this, maybe you should plan ahead unlike me!

Moroccan Spiced Chicken
Adapted from Cook's Illustrated


1 1/4 teaspoons sweet paprika
1/2 teaspoon ground cumin
1/4 teaspoon cayenne pepper
1/2 teaspoon ground ginger
1/4 teaspoon ground coriander
1/4 teaspoon ground cinnamon
2 tsp fresh lemon zest
3 tablespoons fresh lemon juice , from 1 to 2 lemons
5 medium cloves garlic , minced or pressed through garlic press (about 5 teaspoons)
1 whole chicken, cut into 8 pieces (I used about 1.5 lbs of boneless skinless chicken)
salt & pepper, to taste
1 tablespoon olive oil
1 large onion , halved and cut into 1/4-inch slices (about 3 cups)
1 3/4 cups low-sodium chicken broth
1 tablespoon honey
1 medium carrot , peeled and cut crosswise into 1/2-inch-thick coins
1 cup dried apricots , halved (I used about 1/2 cup raisins)
1 (15 ounce) can chickpeas , drained and rinsed
2 tablespoons chopped fresh cilantro leaves

1. Combine spices in small bowl and set aside.

2. Season chicken liberally with salt and pepper. Heat olive oil in large heavy--bottomed Dutch oven over medium-high heat until beginning to smoke. Brown chicken pieces in single layer until seared, but not cooked through, about 4-5 minutes. Transfer chicken to large plate;if using whole chicken, peel off skin and discard.

3. Add onion and lemon zest to the pot, stirring occasionally, until onions have browned at edges but still retain shape, 5 to 7 minutes (add 1 tablespoon water if pan gets too dark). Add garlic and cook, stirring, until fragrant, about 30 seconds. Add spices and cook, stirring constantly, until darkened and very fragrant, 45 seconds to 1 minute. Stir in broth and honey, scraping bottom of pot with wooden spoon to loosen browned bits.

4. Add carrots, apricots or raisins, and chicken (with any accumulated juices) to pot, arranging breast pieces in single layer on top of carrots. Cover, reduce heat to medium-low, and simmer for approximately 10 to 15 minutes.

5. Transfer chicken to plate or bowl and tent with foil. Add chickpeas to pot; increase heat to medium-high and simmer until liquid has thickened slightly and carrots are tender, 4 to 6 minutes. Return chicken to pot and add cilantro and lemon juice; stir to combine and adjust seasoning with salt and pepper. Serve immediately with couscous.

Saffron Couscous with Toasted Almonds
From Cook's Illustrated
4 tablespoons unsalted butter
2 cups plain couscous
3/4 cup sliced almonds
pinch of saffron threads, crumbled with fingers
1 small onion , chopped fine
3/4 cup raisins
Table salt
1 3/4 cups canned low-sodium chicken broth
2 cups water
1 1/2 teaspoons fresh lemon juice from 1 lemon
Ground black pepper

1. Melt 2 tablespoons butter in a large skillet over medium-high heat. When the foaming subsides, add the couscous and cook, stirring frequently with a wooden spoon, until some grains are beginning to brown, about 3 minutes. Scrape the grains from the skillet into a large bowl and return the pan to medium heat. Add the almonds and cook, stirring frequently, until they are lightly toasted and aromatic, about 1 1/2 minutes. Scrape them into a small bowl.

2. Add the remaining 2 tablespoons butter to the skillet. Once it melts, add the saffron, onion, raisins, and 3/4 teaspoon salt and cook, stirring occasionally, until the onion has softened and is beginning to brown, about 5 minutes. Add the broth and water, increase the heat to medium-high, and bring to a boil.

3. Add the boiling liquid to the bowl with the toasted couscous, cover tightly with plastic wrap, and allow to sit until the couscous is tender, about 12 minutes. Remove the plastic wrap, fluff the grains with a fork, and gently stir in the almonds and lemon juice. Adjust the seasonings with salt and pepper to taste and serve immediately.

Tuesday, July 8, 2008

I'm Back with Bread Pudding!

After a fun and crazy week in our old stomping grounds, Chicago, I’m back and ready to catch up. The weekend was a fun one filled with sunshine, good times with friends and LOTS of food. We made a point to visit many of our old haunts and favorite food spots-- cheap, yummy Thai food being the #1 victim of our hunger. Oh, and how can you not love such a gorgeous city? For inquiring minds, the tall building in the middle is Trump's latest monstrosity which is coming together quite nicely.

Though I spent the entire weekend drowning in gluttony, swearing to never eat again, my first post back is one of our favorite gluttonous treats: bread pudding.

Bread pudding is a strange one. Definitely one of my favorite desserts, but one with such a mediocre name. French Silk Pie… Tiramisu… even Mississippi Mud Pie conjure up images of deliciously sinful treats. Ones with sexy names.

Bread pudding, on the other hand, sounds like something probably served at the local Hometown Buffet.Cinnamon Bread Pudding

Well, sexy or not bread pudding is amazingly delicious and though it may contain enough calories to last you a week, its worth it. I’ve used this recipe with a variety of breads, usually whatever’s leftover and I’ve had success with all experiments thus far. Cinnamon Raisin bread and whole wheat baguettes have historically turned out the best. Try it with your leftover, stale bread and let me know what you like! Off to go catch up on all the delicious blog posts I've missed out on.....

Cinnamon Bread Pudding with Warm Vanilla Bourbon Sauce

8 slices cinnamon raisin bread cubes, crusts removed (an equivalent amount of day old whole wheat baguette works well too)
1/4 cup raisins
1 tbsp butter
½ cup mini chocolate chips
3/4 cup brown sugar
1/4 cup sugar
1 cup low fat evaporated milk
3/4 cup skim milk
1/4 cup butter
1 teaspoon ground cinnamon
1/2 teaspoon vanilla extract
2 eggs, beaten
dash of rum

Warm Vanilla Bourbon Sauce

1 tablespoon butter
1 teaspoon ground cinnamon
1/4 cup sugar
1/2 cup milk and 3 tbsp milk mixed with 2 tsp cornstarch
1 tablespoon Bourbon whiskey
1 tablespoon vanilla

1. Preheat oven to 350 degrees F (175 degrees C). Lightly grease a round 9 inch cake pan.

2. Cut cinnamon raisin bread into medium sized cubes and arrange evenly in cake pan.

3. In a small frying pan over medium heat, sauté the raisins with a dash of cinnamon in a tbsp of butter until soft. Toss raisins and chocolate chips with bread cubes.

4. In a small saucepan over medium heat, combine sugars, milk, 1 tbsp cinnamon and butter. Stir until butter is melted. Allow to cool slightly and stir in vanilla. Temper the eggs by adding a few tablespoons of the butter sauce to the eggs. (This step raises the temperature of the eggs to prevent ‘scrambling!’) Add eggs to butter mixture and pour over bread cubes.

5. Create a water bath by filling a large baking pan with sides with ½ inch of water. Place cake pan in water bath & cover cake pan with foil. Bake in preheated oven 40 minutes. Remove foil and bake another 10 minutes uncovered.

Vanilla Bourbon Sauce
6. After replacing the bread pudding in the oven to finish cooking, prepare the Bourbon sauce.

7. Whisk together 3 tbsp milk and cornstarch in a small bowl. Melt butter in a small saucepan over medium heat. Once butter is melted, add Bourbon and sugar and stir constantly until boiling. Slowly add cornstarch mixture to thicken the sauce. Continue cooking until thick, stirring constantly. Remove from heat when thick.

8. After removing bread pudding from oven, pour Bourbon sauce over the bread pudding. Let sit 5 minutes before serving to allow sauce to flavor the bread pudding. The sauce will continue to thicken and form a beautiful glaze over the bread pudding.

Wednesday, July 2, 2008

It's a Sushi Party!

Tekka Maki with CucumberI'm always a little bit confused by those who claim they don't like a certain food because "they never grew up eating it." Well, I'm proof positive that you can break through these barriers! My parents would rather starve than dine on succulent raw fish, so they are obviously major haters of sushi. My mom also orders steak at a five star restaurant well done so I suppose her need for cooked fish is no surprise.

Tekka Maki:
Tuna Cucumber Roll

On the flip side, hubby and I harbor a tad bit of an addiction to sushi of all kinds. Whether it's served in a hole in the wall restaurant or a "traditional" Japanese joint, we welcome it all. Strangely enough, we've never made it ourselves.

After having a bit too many tastings of wine, I purchased a sushi mat at Robert Sinskey Vineyards in Napa Valley. I suppose that after shelling out our life savings on wine bottles, it was a welcome sight to see something cost less than $5 & the bargain shopper in me couldn't resist. Oh, and isn't drunk shopping the best kind? :) In any case, the sushi mat has been sitting in my cupboard for months until hubby and I finally decided to take the plunge & have ourselves a little sushi party.

Rolling the sushi was much easier than I expected though I still have plenty of room for improvement. Follow one of the many tutorials online and you'll be a pro in no time! Be sure not to overstuff and you'll be fine. Finding the right balance between fish, veggies & rice was the biggest challenge for me. Some rolls, like the first picture had too much rice while others didn't have enough. For those in the area, El Pescador is an excellent source for yummy fish.

Sake (Salmon) Sweet Chili Maki:
Sweet Chili Salmon MakiHere's the sushi rice recipe we followed, based on the 4-5 websites and cookbooks I had open at the same time. Feel free to scale down the recipe; the ratio of rice to water is about 1 1/4 cups of water to 1 cup of rice.

Sushi Rice
2 cups sushi rice
2 1/4 cups water, plus extra for rinsing
2 tablespoons rice vinegar
2 tablespoons sugar
1 tsp salt
electric fan

Place the rice in a fine sieve and rinse with cool water. Continue to rinse and toss rice until water runs clear.

Place the 2 cups of rice into a medium sized saucepan and cover with 2 1/4 cups of water. Bring the water to a boil. Once the water is boiling, reduce the heat and cover. Cook for 15 minutes and then remove the rice from the heat, covered for 10 minutes.

In a small saucepan, combine the rice vinegar, sugar and salt. Heat until the sugar dissolves.

Once the rice has set, pour into a shallow bowl. It's important to cool the rice down quickly so either have someone else help you to fan the rice or bring over an electric fan. With fan blowing on rice, mix in the rice vinegar mixture and use cutting strokes to mix in the seasoning. Take care to cover all of the rice with the seasoning.

Cover with a damp kitchen towel & allow rice to come to room temperature before using.

Sushi Rolling tutorial

Sweet Chili Salmon Maki

Sprinkle salmon with salt and pepper. Heat olive oil in a skillet and sauté salmon for about 2-3 minutes on each side. Allow to cool and gently flake salmon. When rolling sushi, line salmon down the rice and pour sweet chili sauce alongside. Include cucumbers or avocado if desired & follow sushi rolling technique above.


Happy 4th of July!!