Showing posts with label vegetarian. Show all posts

Monday, March 1, 2010

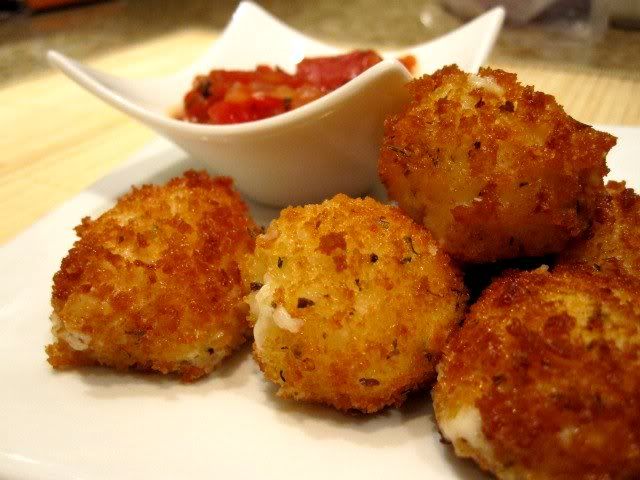
Fried Mozzarella Bites with Homemade Tomato Sauce

ooey gooey deliciousness. I toyed with titling this post those very three words, but thought that just might be weird. But, now that you're here and reading, I'll just go ahead and tell you there is nothing better than any foods that can be described as ooey gooey deliciousness! With a crisp shell and a gooey, melted cheese center, each of these mozzarella bites tasted a little bit like {fried} heaven dunked in tasty, amazing sauce.

Mozzarella Balls

I'd like to say these are perfect party foods, but the bites are best eaten straight from the fryer. I'm not sure how elegant of a party you typically host, but nothing about deep frying inside of your house is at all sophisticated in my opinion. First off, the smell lingers in your house for days, and then there's me, the ever put-together chef, freaking out about dropping things in hot oil and periodically yelping like a scared baby.

Fried Mozzarella Bites

So, yes. I'm advising you to make these and enjoy them all on your own. The minor heartburn afterwards? SO definitely worth it!

PS. I must thank my mother for giving me this most dreaded Christmas gift, the infamous Fry Daddy. While I looked at it with glee, I knew it would only spell diet disaster. Yes, you can fry anything, especially in our house! After devouring bite after yummy mozzarella bite, hubby decided to use the extra breading and fry a steak. Gross!! Ok...I lie. It was pretty good.

Fried Mozzarella Bites with Homemade Tomato Sauce
slightly adapted from Pink Bites 

1 8 oz container of mozzarella balls (I used the ciliegine, "cherry" sized mozzarella balls)
2 large eggs
1/4 cup of milk
1 cup of plain flour
2 cups of panko
1 tablespoon of dried oregano
1/2 teaspoon garlic salt
salt and pepper
canola oil for frying
 (you'll end up with a lot of excess flour, breading, etc.  Halve the breading if you prefer, but having the excess makes dunking easier! Or, you can double the amount of cheese)

1.  Drain the cheese and dry on paper towels. Prepare your breading station by having 3 bowls ready. Put flour in one, season with salt and pepper to taste. Mix the eggs with the milk and pour into the second bowl. Add the breadcrumbs with the dried oregano and garlic salt to the last bowl and mix well.

2. Dip each piece of cheese in the flour, then in the egg mixture and lastly in the breadcrumbs, shaking off excess after each step. Repeat the breading process again and place cheese balls on a flat plate.

3.  Heat about oil up to minimum line in Fry Daddy or in a medium sauce pan to 350 degrees. Carefully lower cheese balls, a few of a time and cook until they are golden, about a minute or so. Remove and drain in paper towels. Repeat with the remaining cheese making sure oil comes up to temperature before adding more cheese.

Tomato Sauce:
1 tablespoon of olive oil
1/2 onion, chopped
2 garlic cloves, chopped
1 14.5 oz can of fire roasted diced tomatoes (try Muir Glen)
1 teaspoon dried basil
1 teaspoon dried oregano
1/8 teaspoon red pepper flakes
salt and pepper

1. Heat the oil over medium-heat and add the onions. cook until translucent, about 6 minutes. Add the garlic, cook for a minute more and add the diced tomatoes.

2. Fill half of the tomato can with water and add to the pot. Add spices and bring to a boil. Reduce heat, cover and simmer for about 20 minutes, until sauce is thickened (this process took awhile for me.  I let simmer until very thick b/c I like thick sauce). Season with salt and pepper to taste.

Wednesday, February 3, 2010

Crispy Kale and Tofu Salad with Coconut

I fully realize that I teased you with the prospect of Fry-Daddy recipes and photos. But, before I go on my fatty-bo-batty kick, I thought I'd leave you with one more uber healthy recipe. In an effort to expand my cooking horizons, I made perhaps my third tofu dish ever. Though I'm a huge fan of tofu, I just haven't had a ton of luck cooking with it.

Coconut Brown Rice Kale SaladLuckily, this fairly simple, but not that attractive recipe came together quickly and tasted quite yummy despite the healthy virtues of its contents. When I first spotted this in Food & Wine magazine, it seemed to be such an odd concoction of ingredients that I was immediately intrigued, mystified and inspired to make it despite my past failures with tofu. I'm not sure how one thinks of combining brown rice, kale, coconut and tofu in one dish but it works!

Coconut Kale SaladBecause I'm a self admitted salt fiend/addict, I added Kosher salt to the salad before baking. Since kale seems to soak up salt like a sponge, please sprinkle judiciously. I think I went a little too far and ended up with one salty dish, which is fine by me but probably not the best for you!

Crispy Kale and Tofu Salad with Coconut
slightly adapted from Food & Wine
1 cup short-grain brown rice
Salt
1/3 cup extra-virgin olive oil (I used about 1/4 cup and thought that was more than enough)
1 teaspoon toasted sesame oil
2 tablespoons soy sauce
1 1/2 pounds Lacinato (flat) kale—stems and ribs removed, leaves chopped
1/2 cup unsweetened coconut flakes
1/2 pound extra-firm tofu, cut into 1/4-inch cubes (about 2 cups)
pinch of Kosher salt

Preheat the oven to 350° and position racks in the lower and upper thirds of the oven. In a saucepan, combine the rice with 2 cups of water and a pinch of salt; bring to a boil. Cover and simmer over low heat for 35 minutes, until the rice is tender.

In a small bowl, whisk the olive oil with the sesame oil and soy sauce. Transfer two-thirds of the dressing to a large bowl. Add the kale, coconut and tofu; toss to coat, then spread on 2 rimmed baking sheets. Bake for 25 minutes, until crispy. Sprinkle lightly with kosher salt. Stir once or twice and shift the pans halfway through baking. Return the mixture to the large bowl and toss with the remaining dressing and rice. Season with salt and serve right away.

Tuesday, January 5, 2010

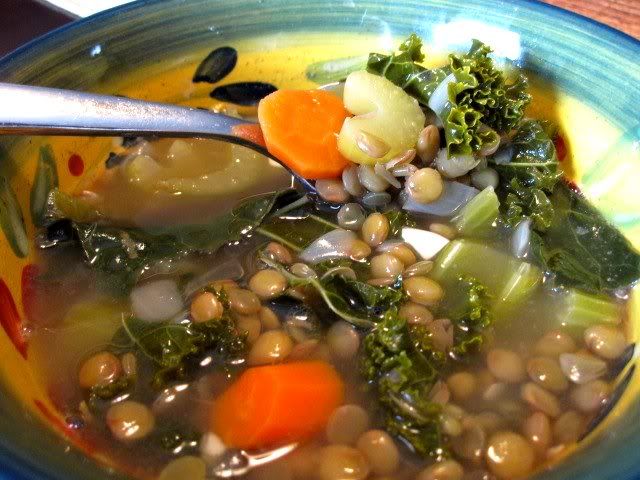
Ellie's Lemony Lentil Soup with Greens

For all you go-getter-New Years-resolution-people who happened to be clogging up the gym tonight at 6pm, here's an uber healthy meal that I made not while trying to be healthy, but because I was cold.

Lemony Lentil Soup with GreensAlas! Lucky me, it also happened to be quite a hearty meal and left me with a bead of sweat on my nose when dinner was finished. Chock full of goodies, this soup packs 30g of protein per 2 cup serving and gobs of iron from the lentils. Add in some carrots, kale and celery and you've got yourself a vitamin packed power meal.

I was initially skeptical of this recipe because I gravitate towards thick soups, not broth based soups, and let me tell you this guy uses a lot of broth - 12 cups to be exact! However, the hint of lemon gives the soup a lift and brings out a good flavor. Tastes are sometimes hard to change though, and I think next time I'll experiment with smashing some beans or lentil to make the soup a little thicker. All in all this was a good soup that I'll make again.


Lemony Lentil Soup with Greens
adapted from Ellie Krieger's So Easy: Luscious, Healthy Recipes for Every Meal of the Week
(definitely one of my new favorite cookbooks!)
Ellie Krieger Cookbook
2 tsp canola or olive oil
1 small onion, chopped
2 carrots, peeled and chopped
2 stalks celery, chopped
2 cloves garlic, minced
16 oz green lentils
12 cups low-sodium chicken broth, plus more as needed
1 teaspoon dried basil
1 teaspoon dried thyme
1 teaspoon Kosher salt
1/2 teaspoon garlic salt
8 cups chopped kale leaves (about 6 oz)
3 Tbsp fresh lemon juice
1 tsp finely grated lemon zest

1. Heat the oil in a stock pot over medium- high heat. Add the onion and cook, stirring, until softened and translucent, 3 to 5 minutes. Add the carrot, celery, and garlic and cook, covered, stirring occasionally until the carrots are softened, about 5 minutes.

2. Add 12 cups of the broth, the lentils, basil, thyme, garlic salt and salt, and bring to a boil. Reduce the heat to low, add the kale, and cook until the lentils are tender, 30 to 35 minutes, adding more broth if necessary. Stir occasionally while simmering. When finished, stir in the lemon juice and zest and serve.

Thursday, December 24, 2009

Spicy Parmesan Green Beans and Kale & Happy Holidays!

Happy holidays everyone! Being a relative newcomer to California, I still have a hard time adjusting to a warm & sunny Christmas. Where's the snow, people? Luckily (or unluckily) our house is so poorly insulated that we will probably spend our nights sipping hot cocoa and wearing fuzzy slippers anyway. Here's to wishing all of you warm and cozy nights with your family :)


This yummy & healthy dish is my new holiday favorite. Surprisingly, this veggie dish was the hit of our Thanksgiving spread (I'm still partial to dessert, of course) and I plan on bringing it to Christmas dinner at our friends' house tomorrow. Sauteed kale, green beans and mushrooms are nicely spiced with red pepper flakes, lemon and Parmesan cheese. It doesn't get much easier than this, folks!

Have a very Merry Christmas and stay warm!

Spicy Parmesan Green Beans and Kale
adapted from my favorite cook I love to hate (Giada)

3 tablespoons olive oil
1 onion, sliced
1 large clove garlic, minced
1/4 pound cremini mushrooms, trimmed and quartered (about 14 mushrooms)
1 1/2 pounds green beans, trimmed and slice into 1-inch pieces
2 teaspoons salt
1/2 teaspoon freshly ground black pepper
1/4 cup white wine
1/2 teaspoon red pepper flakes (I used a 1/4 teaspoon)
1 bunch kale (1/2 pound), rinsed, stemmed, and roughly chopped
2 tablespoons lemon juice
3 tablespoons finely grated Parmesan + extra for sprinkling

1. Warm the olive oil in a large, heavy saute pan over medium-high heat. Add the onions and cook until translucent, about 4 minutes. Add the garlic, mushrooms, green beans, salt, and pepper and cook for 2 minutes.

2. Add the wine and continue cooking until the green beans are almost tender, about 5 minutes. Add the red pepper flakes and the kale and continue cooking until the kale has wilted, about 4 to 5 minutes. Add the lemon juice and the Parmesan cheese. Toss to coat. Sprinkle with extra Parmesan to taste and serve immediately.

Monday, September 28, 2009

Sesame Peanut (long life) Soba Noodles

Though my mother has been doing it for years, I've just now jumped on the bandwagon of using peanut butter in sauces and especially Asian dishes. In my younger, more health conscious days I scoffed at her peanut sauces fearing the fat and calories. Um, these days I just can't get enough! To hell with the diet! :)


Paired with a heartier buckwheat noodle, peanut butter shines but does not overpower this dish. Mixed with a little red pepper, rice vinegar, sweet chili sauce and soy sauce, these noodles epitomize my love of sweet & savory dishes. And while it may be Fall for many of you around the country, good ol' SD continues to surprise me with record high temperatures and an absurdly hot, un-air conditioned kitchen. Luckily you can serve these noodles cool, warm or hot depending on the temps in your area.


If you need to reheat, a touch of water and soy sauce helps to bring these noodles back to life. Speaking of life, its hubby's birthday & following my mother's tradition, noodles bring long life to the birthday boy or girl consuming them. Just don't cut the noodles lest you lead a broken or shortened life. Ahh, mama always knows best!

Sesame Peanut Soba Noodles
adapted from Crabby Cook

4 Tablespoons Peanut Butter
3 Tablespoons Honey
4 Tablespoons Water
1 Tablespoon sweet chili sauce
2 Tablespoons low sodium soy sauce
1/4 teaspoon garlic powder
1 Tablespoon Rice Vinegar
1 Tablespoon Sesame Oil
Crushed Red Pepper Flakes, to taste

9 oz. cooked soba noodles
3/4 cup julienned carrots
Sesame Seeds for garnish

Cook the soba noodles according to package directions. Run soba noodles under cold water and then allow to drain fully.

While soba are cooking, combine all sauce ingredients in a small saucepan over low heat. Gently stir until peanut butter fully combines into sauce. Pour sauce into large bowl.

Heat saucepan over medium heat and saute carrots until crisp-tender. Remove from heat.

Toss soba and vegetables with sauce and carrots, mix well, ensuring the noodles are evenly covered in sauce.

Cover and allow to rest for about 20-30 minutes before serving.

Tuesday, September 22, 2009

Black Bean Mushroom Burgers

First off, congrats to the winners of the Macy's shopping giveaway! Amber (lucky #3) would host a black and white themed party while Kerstin (lucky # 15) wants to host a Mexican themed party with guac and margs. Yum! Thanks for entering the giveaway and let us know what you buy!

On to other good stuff...Do you ever find yourself making something that tastes so delicious but looks utterly unattractive? Well, file me under "ugly but yummy" because I truly struggled whether I should post these or not. In the end, I couldn't resist because we loved these Black Bean Mushroom burgers so much.


Black Bean Mushroom BurgerAmong good things in life, black beans and mushrooms hang out at the top of my list. Unlike other things that hang out up there (cake & ice cream), these ingredients are actually good for me and you. Even better, my carnivore hubby gave these a big thumbs up so rest assured, you too can subject a vegetarian meal upon your favorite meat eater.

Grab your handy dandy food processor and get to work. Black beans are whirled with sauteed baby bellas, a little bread crumb action and cilantro. Add goat cheese and form into yummy patties. Though we fired these up on the grill, things got a little messy and next time I will just saute them in a pan with a lot of cooking spray and/or olive oil. They're a little too fragile for the grill in my opinion. Serve on toasty English Muffins and you have yourself a veg treat!

I found these tasty burgers on Culinary in the Country and stayed pretty true to the recipe so head on over there to check it out. My only recommendations would be to use a full tub of goat cheese, consider using more bread crumbs, and to saute these babies!

Tuesday, August 18, 2009

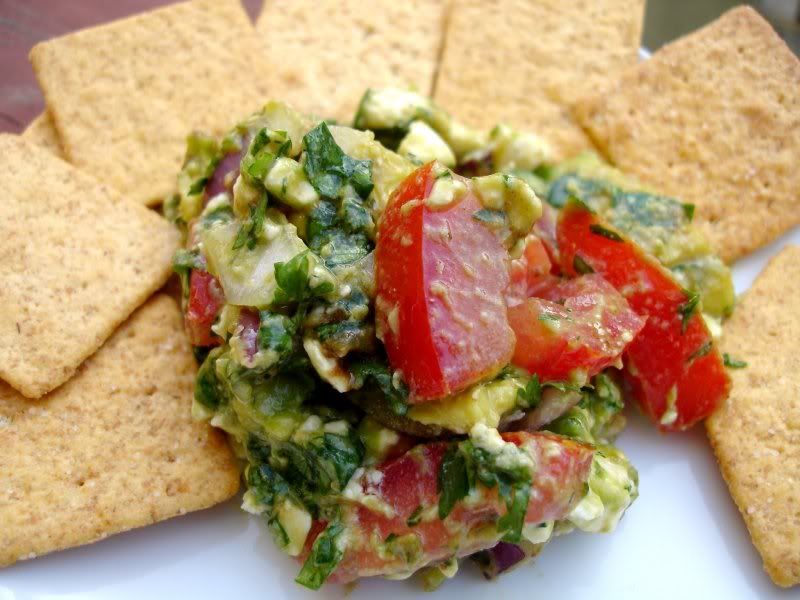
Feta Avocado Tomato Dip

When the sun is blazing and our non-air conditioned house heats up, spending time sweating in the kitchen seems like a dangerous proposition. While I may be a bit of a baby when it comes to cold temperatures, I get equally cranky when the temps rise. I suppose its a good thing we're in San Diego now, huh?


Luckily I have an arsenal of light, no-heat recipes that save hubby and me from eating out every night...or having cranky me heat up our kitchen and house. This dip is one of my all-time favorites that I like to make after a trip to the farmer's market. Best paired with crackers, pita, or baguettes, I particularly love this dip because it gives me a reason to indulge in my most absurd obsession: Wheat Thins. Mmm...of all the good things on the earth, I would pick Wheat Thins over almost any snack as my last on earth :) Enjoy this cool & fresh snack!


Feta Avocado Tomato Dip
courtesy of Ralph's recipes

2 avocados, chopped
4 tomatoes, chopped
1 small red onion, chopped
1 bunch cilantro, chopped
4 oz. crumbled feta cheese
1/4 cup olive oil (I used a little less)
1 Tbsp. white wine vinegar
1 Tbsp. ground cumin
1 tsp. kosher salt

Combine avocados, tomatoes, and onion in a bowl. Mix gently & stir in the cilantro. Add feta, olive oil, vinegar, cumin and salt. Mix until combined. Cover and chill in the refrigerator until ready to serve.

Monday, July 6, 2009

Feta Stuffed Tomato and Basil Phyllo Pizza

Hope everyone had a happy 4th of July weekend! We spent the day relaxing on the beach, basking in the sun and visiting a few local drinking establishments. During those precious moments when I was not relaxing, drinking or sunning myself, I packed (...boxes and boxes of crap)! We are getting ready to move to a new house in just a few short days so sadly cooking has been on the decline.

Tomato & Basil Phyllo Pizza
Everyday, hubby packs up a little bit more of the kitchen and I find myself missing key kitchen items like my food processor, cutting boards, & knives while in the midst of preparing a recipe!

So, to save us both from WWII, we officially "shut down" our kitchen tonight with a very summery Feta Stuffed Basil and Tomato Phyllo Pizza from July's Cooking Light.

Feta Phyllo Pizza
Our basil plant's life was coming to an end so we thought we'd give him one last chance to shine along with my favorite cheese, feta. Though phyllo is sometimes tricky to handle, this is a great "throw together" meal that's a perfect appetizer for guests or just a light dinner. As for us, we sat outside with two glasses of white wine, munching away on our last meal in our first apartment as a married couple :) Enjoy!

Click here for the recipe
*The only modification I made was to double the cheese & tomatoes and use full sheets of phyllo instead of halves.

Monday, July 21, 2008

Protein Mania: Summer Black Bean Quinoa Salad

Since the temperatures were once again above the 90s, we spent our weekend as tourists, hopping from one air conditioned museum to the next. As you may know, Washington, D.C. has an amazing collection of sprawling & ornate buildings, war and presidential monuments and a museums for just about any topic you could think of. Probably most famous is the collection of 19 museums of the Smithsonian Institution.


{Photo Courtesy of Edweek.org}

One of my favorite museums of the day was the National Museum of the American Indian, housed in an absolutely stunning building pictured above. Among the exhibits portraying the past & present life of Indians (Northern and Southern American) I of course, was particularly interested in the lifestyle, food and cooking artifacts.

Though certainly trendy at the moment, I learned that tiny quinoa once served as a staple food for the Ancient Incas, powering their armies and sustaining their communities as one of the three food staples (along with potato and corn). Historians believe the Incas worshiped quinoa as a sacred plant and deemed it "the mother grain." In today's world, quinoa provides a nutritional bouquet of vitamins, protein and contains all of the essential amino acids the human body needs. In fact, quinoa provides up to 16.2% of the daily recommended protein and more calcium than a glass of milk! Paired with black beans, you have yourself quite a protein combo.


Inspired by our trip, I decided to make some quinoa and have a taste of this ancient grain (which technically is not a grain, but a seed). I know, I'm probably one of the last food bloggers to try quinoa, but now is better than never, right? Overwhelmed by the amount of recipes available, I followed a cooking technique outlined by Gourmet Magazine that calls for the quinoa grains to first be boiled, then steamed in a fine sieve. Note to all novices, um...if you have a plastic sieve, you might want to re-think this step before proceeding. Um, not that I did this or anything.


I added red peppers and cucumbers to the original recipe to make for a very colorful and hearty salad, perfect for the summertime. I also halved the amount of butter and oil to cut down on fat and still think this was delicious. Quinoa has a similarity to couscous and for its nutritional value & ease in cooking, I will definitely be making it again and again. Once I decide to like something, it'll be on our menu for quite awhile :)

For those of you who like to be in the know, quinoa is pronounced "KEEN-wah," not "Que-in-oahh" as some near and dear to my heart like to say.

Since this salad is a protein-rich, low fat 'superfood' I'm sending this recipe over to the Healthy Cooking event hosted by Fun and Food and also the One D (One Dish) Salads roundup hosted by Archana's Kitchen.

As a last note, if you do visit the National American Indian Museum or any of the museums in the Mall, take a pit stop at the Mitsitam Cafe where you can be treated to quinoa. The Cafe boasts native cuisine from the Northern Woodlands, South America, Meso America, the Great Plains, and the Northwest Coast and Columbia Plateau. The food is delicious and a unique treat!

Summer Black Bean Quinoa Salad
Adapted from Gourmet Magazine, July 2007
1 cup uncooked quinoa
2 teaspoons grated lime zest
2 tablespoons fresh lime juice
pat of butter, melted (use a tablespoon if you dare!)
1 tablespoon olive oil
1 teaspoon sugar
1 can (14.5 oz) black beans, drained & rinsed
1/4 cup diced red pepper
1/4 cup seeded & diced cucumber
1 roma tomato, chopped
1/4 cup fresh chopped cilantro

1. Rinse quinoa in a fine sieve, rubbing grains and washing until water runs clear. Do not skip this step as unwashed quinoa is bitter.

2. Cook quinoa in a medium saucepan of salted boiling water, uncovered for 10 minutes. Drain quinoa in sieve. Place about 1-2 inches of water in sauce pan and heat until simmering. Place sieve over pot and cover with dish towel & lid. Steam for about 10 minutes. Remove pot from heat and remove lid. Let stand, covered with dish towel for about 5 minutes. Put pat of butter in pot and set aside to melt.

3. Whisk together lime zest, juice, olive oil & sugar. Add red peppers, black beans and tomato to warm pot. Drizzle with the lime mixture and toss gently. Add cilantro and drained quinoa. Fluff with a fork to combine. Cover with lid and allow to sit for 30 minutes.

Monday, July 14, 2008

Too Hot to Cook?

It's officially blazing...Summertime is in full effect! I've been spending some quality time in our nation's capital and the humidity here is slowly killing me. The cool summer breezes of San Diego feel like a distant, fond memory and I'm beginning to have dreams that I'm trapped in a sauna. Have you ever seen the movie A Time To Kill where Ashley Judd spends a considerable amount of the movie sweating? Well, that's me but I don't quite pull off the sexy sweaty look as well as Ashley.


This past weekend, a quick jog through the park turned into a sweaty, cardio attack on my body. I say 'attack' as the combination of steep hills, blazing sunshine and opressive humidity made my body think that I was launching an assault on myself. Though I consider myself to be in fairly good shape, I suppose I'm not in DC shape. Though I used to easily run 5-6 miles a day, somehow I can barely eek out about 4 these days.

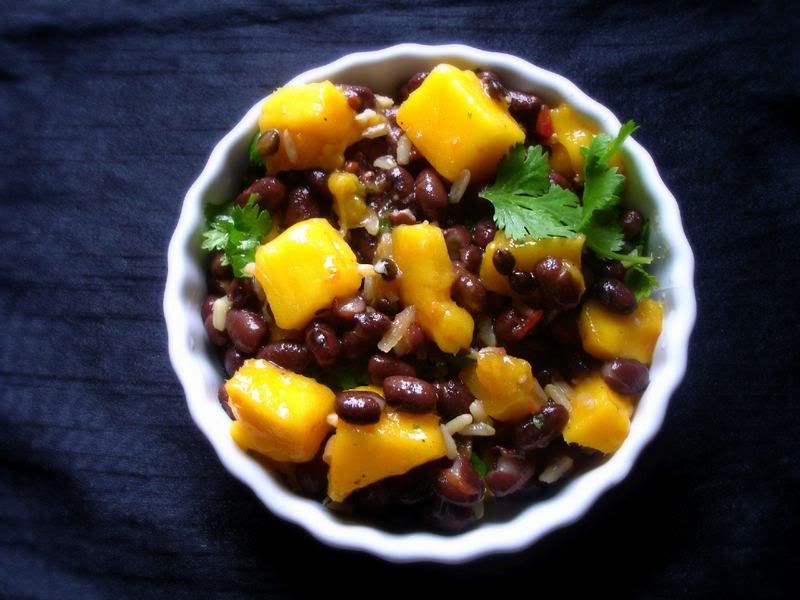
Alright, enough crying & complaining for now. For those of you who are equally trapped in miserable heat, here's a quick & refreshing side dish that I've begun to enjoy for lunch. It's quite a nutritional powerhouse and I am happy to report that you won't break into a sweat while making this Mango & Black Bean Salad. This also pairs well with fish and shrimp dishes if you're brave enough to turn on your stove or oven!

Because this is a healthy little treat, I'm submitting this to Cate's ARF/5-A-Day roundup at her lovely site, Sweetnicks. Check out her roundup every Tuesday for some healthy inspiration.

Beat the Heat Mango & Black Bean Salad
Adapted from Cooking Light
1 1/2 cups chopped, ripe mango
1/2 cup cooked wild rice
3 tablespoons chopped fresh cilantro
2 tablespoons fresh salsa (I used peach mango salsa)
2 tablespoons fresh lime juice
1 tablespoon extra virgin olive oil
3/4 teaspoon Kosher salt
1/4 teaspoon freshly ground black pepper
1/8 teaspoon red pepper flakes (use more if you like heat)
1 15 oz. can black beans, drained & rinsed

Combine all ingredients in a large bowl. Toss gently to mix.

Print the recipe here:

Mango & Black Bean Salad

See Mango & Black Bean Salad on Key Ingredient.

Wednesday, June 18, 2008

Roasted Red Pepper and Edamame Postickers

Since the demise of Tastespotting, many sites have popped up in its place. While I do miss Tastespotting, this game of chasing around new websites has been pleasurable indeed. I must say, I’m in awe of all the talent out there. Besides good photography skills, are these bloggers blessed with both patience and patient food gobblers?

Most of my cooking adventures involve a little spilling of liquids, a splash of flour in my hair (if I’m baking), a little chaos in the kitchen and a lot of heat. Martha Stewart, I am not. Once all the disorder dies down, I’m usually hungry and hubby is ready to get at whatever’s been causing all of the kitchen madness. I like my food HOT and I like it now. Hence, no time for photos unless we have leftovers!

Take for example, today’s vegetarian treat: Roasted Red Pepper and Edamame postickers. Here are the only photos I managed to take-
Edamame Filling: Ready to pop into the steamer/skillet:I decided to do a little taste test comparison and pan fry some as postickers and steam others to make dumplings. Both versions were good, but we (mostly he) gobbled these up so fast, I didn’t have time to snap any 'after' photos. Good thing Tastespotting is gone…the pressure is off! :)

These dumplings were simple & delicious. If you're hankering for some photos of the finished product, Recipe Girl made some similar edamame dumplings you can enjoy.


Roasted Red Pepper & Edamame Dumplings
Adapted from Cooking Light and spotted on Recipe Girl

1 garlic clove, roughly chopped
3/4 cup frozen shelled edamame (green soybeans)
¼ cup chopped roasted red pepper
¼ cup fresh cilantro, roughly chopped
1 teaspoon fresh lemon juice
1 teaspoon dark sesame oil
1 teaspoon soy sauce
1/2 teaspoon ground pepper
¼ teaspoon red pepper flakes
¼ teaspoon Kosher salt
15-20 round posticker wrappers (depending on how much filling you use)
cooking spray
½ cup water, divided

Cook edamame according to package directions; drain. Rinse edamame with cold water; drain well. In a food processor, chop garlic until minced. Add edamame, roasted red pepper, cilantro, lemon juice, sesame oil, soy sauce pepper, red pepper flakes and salt in a food processor; process until smooth.

To make postickers, spoon about 1 heaping tsp. edamame mixture in center of each wrapper. Moisten edges of dough with water; bring opposite ends together and pleat edges to seal.

Heat a large nonstick skillet over medium-high heat. Coat pan with cooking spray. Arrange half of dumplings in a single layer in pan; allow bottoms of postickers to brown; Add ¼ cup water to pan; cover and reduce heat to medium. Cook 30 seconds; uncover. Cook 1 minute or until liquid evaporates. Repeat procedure with remaining dumplings and water.

To make steamed dumplings, place mixture in center of wrapper and bring sides of wrappers up around filling.

Heat water in a large steamer and spray steamer basket with nonstick cooking spray. If using bamboo steamer, line with lettuce leaves. Place dumplings on steamer rack and steam for approximately 8-10 minutes.

**Both versions are delicious served with a soy dipping sauce. I usually combine soy sauce with a dash of rice vinegar and a dash of sesame oil. Tasty!

Wednesday, June 11, 2008

Spinach Black Bean Lasagna

Back in the day when hubby and I were glowing and engaged, we had the great joy of planning our wedding and the most fun of all: the reception menu. With the carnivores in charge (our families and hubby) we of course, had Filet Mignon as the main act. For my sake, we added a Lobster Tail as the supporting act. For the sake of our 3-5 vegetarian friends, we decided to offer the option of a vegetarian plate on the RSVP cards.

A ridiculous number of invitations went out (big families all around), and finally, I had a wave of relief after surviving several wedding invitation disasters. After practically dancing and skipping out of the post office, I came home and looked lovingly at one of our extra invitations.

“WE SPELLED VEGETERIAN WRONG!"

That’s right, ladies and gents. 300+ of these babies went all across the country & over the Pacific Ocean to Asia asking my dearest friends and family if they were “vegeterian.” Ever since then, I’ve had it against vegeterians :)

#2 of the Carnivore’s Vegetarian Menu:
Spinach Black Bean Lasagna


Though I absolutely love black beans, I wasn’t quite sure I wanted them in my lasagna. Where’s all the creamy cheese and ground meat? Well, the cheese is still there. Black beans stand in for the usual ground turkey or beef and make both the sauce and filling hearty with a little dose of protein for good measure. The beans are mashed into the pasta sauce so their taste, while still present, is much more subtle than you’d expect. Spinach, red pepper, mushrooms and onion round out the filling with zesty Mexican cheese topping each lasagna layer. Though it may not look all that appetizing below, I promise it is!

Ricotta/Parm/Spinach/Pepper/Mushroom Goodness:

I usually like to make my own pasta sauce, though it typically simmers for about 2 hours; the lasagna takes 1 hour to bake so unfortunately, I didn’t have 3 hours to dedicate to dinner this go-around. I cheated and used two jars of pasta sauce: 1 Mushroom Marinara and 1 jar of Newman's Own Sockarooni sauce. If you are lucky enough to have a big batch of homemade sauce in the freezer, this would be a perfect time to bring it out!

Kevin from Closet Cooking is hosting Presto Pasta Night this week so hurry up and get your entry in!

Spinach Black Bean Lasagna

Lasagna Filling
½ large red bell pepper, finely chopped
1/4 cup sweet onion, finely chopped
½ teaspoon cumin
¼ teaspoon chili powder
1 tsp olive oil
½ cup sliced mushrooms
2 large eggs, beaten
1 (15 oz) container ricotta cheese (lowfat is OK, but don’t use nonfat)
1 (10 oz) package frozen chopped spinach, thawed and drained
1/4 cup chopped fresh cilantro
1/2 teaspoon Kosher salt
¼ cup fresh Parmesan
4 cups shredded Mexican Cheese blend (or Monterey Jack), divided

Black Bean Lasagna Sauce
2 cans black beans, rinsed and drained
2 (26 oz) jars pasta sauce or approximately 5 cups homemade pasta sauce
1/2 teaspoon ground cumin
¼ teaspoon ground black pepper (approximate, add more to taste)
9 precooked lasagna noodles (can use no-boil lasagna noodles, if available)

chopped fresh cilantro , for garnish

Preheat oven to 350 degrees and spray a 13 x 9 baking dish with nonstick spray.
Heat olive oil in a medium nonstick skillet over medium high heat. Add red pepper, onions, and ½ teaspoon cumin and the chili powder; sauté until tender about 6 minutes. Set aside to cool.

In a large bowl, stir together mushroom, eggs, ricotta, spinach, cilantro, salt, Parmesan cheese and 1 cup of the Mexican cheese. Add red pepper / onion mixture. Set aside.

Mash black beans with a potato masher or a hand held immersion blender (I have neither and tried using a fork – not recommended without high levels of patience!) Stir in pasta sauce, cumin and black pepper, to taste. Spread 1/3 of the sauce on the bottom of the baking dish. Layer with 3 noodles, half of spinach filling mixture, and 1 cup Mexican cheese. Repeat next layer with sauce, 3 noodles, remaining filling and cheese. Top with remaining noodles, sauce and cheese.

Bake, covered, at 350° for 1 hour. Uncover and top with remaining cheese. Bake 5 minutes or until cheese melts and is bubbly. Garnish, with chopped cilantro.

Monday, June 9, 2008

The Carnivore's Gone Veg!

sweet potato streusel bread

That's right, folks. The Carnivore and his wife have decided to go vegetarian! Well, for a little bit at least. Before the Poultry farmers of America & the Cattleman's Beef Board begin fretting for their livelihood, this meat-free household is a temporary experiment. One night after much thought & prodding, Hubby couldn't remember the last time he went a day without eating meat:

"Hmm, maybe when I was a baby?!"
Wrong Answer.

As valiant as my meat eating efforts have been, we figured it was prime time to incorporate some more vegetables in our diet and an excellent opportunity for me to experiment with vegetarian cooking. So far, this challenge hasn't been too difficult. I've enjoyed exploring all the great vegetarian blogs (here or here, for example) & cookbooks. I haven't been tempted until I went out with a friend for a bite to eat at Girard Gourmet. Out came our food: a fragrant, hearty lamb stew that smelled like heaven (for her), a Greek salad with limp lettuce and oily cucumbers (for me). I've never lusted for meat quite like that! mmm...well, that sounds wrong, huh?

I'm happy to report back that my first vegetarian dinner was a great success. So much so that I didn't have time to take a photo as we quickly devoured our meal. After being overwhelmed by all the veggie options I had bookmarked, I decided to make the Sweet Potato and Black Bean Enchiladas from Karina's Kitchen.

While I wasn't initially sure about the flavor combination, its hard for me to describe how delicious the recipe turned out. The enchiladas were light and summery & I think they'd be great in the future with a little bit of fruit - maybe pineapple or mango. I gratuitously complimented my vegetarian culinary skills during the entire meal; Hubby enjoyed them, but he also seemed a little bit in shock at what I had somehow committed him to.

Since I had some leftover sweet potato (...or yam, whatever. Don't get me started!), I decided to make a Sweet Potato Streuseled Bread. Ginger, cinnamon, and orange zest add a nice spice, while the walnut brown sugar streusel lends the right amount of sweetness and crunch to this hearty bread. The streusel definitely makes the bread, so don't skip it as I usually do with quick breads! A good quality orange juice as also a must as the orange flavor definitely stands out in the bread.

While I don't think I'll be replacing my favorite banana bread quite yet, the bread was a great way to use up leftover sweet potatoes and sneak in some Vitamin A into our diets (think of it as a multivitamin in dessert bread form, it'll make you feel better!)

Sweet Potato Walnut Streusel Bread
adapted from Southern Living

1 large sweet potato (about 12 ounces)
1 tablespoon butter
1/4 cup chopped walnuts
2 tablespoons dark brown sugar
1 1/2 cups all-purpose flour
1/2 cup whole wheat flour
3/4 cup packed dark brown sugar
2 teaspoons baking powder
1 teaspoon ground cinnamon
3/4 teaspoon salt
1/4 teaspoon ground ginger
2/3 cup fresh orange juice (you may need a few extra tablespoons to moisten the dough sufficiently)
3 tablespoons vegetable oil
1 large egg, lightly beaten
1/2 teaspoon fresh orange zest (approximate, about 3-4 swipes of the grater)

Cooking spray
cinnamon finishing sugar (optional)

Preheat oven to 350°.
Cook potato in either microwave or by boiling. Once softened, mash the potato to measure about 1 cup.

Place butter in a microwave-safe bowl. Microwave for 20 seconds or until soft. Stir in walnuts and 2 tablespoons brown sugar.

Lightly spoon flours into dry measuring cups; level with a knife. Combine all-purpose flour and next 6 ingredients (all-purpose flour through ginger) in a large bowl. Add mashed sweet potato, juice, oil, egg, and orange zest. Stir with a spatula until well blended. Add more orange juice by the tablespoon, if dough seems to dry.

Spoon batter into an 8 x 4-inch loaf pan coated with cooking spray. Drop walnut mixture by spoonfuls over top of loaf; gently press into batter. Sprinkle with cinnamon finishing sugar, if using.

Bake at 350° for about 50-55 minutes or until a toothpick comes out clean. Cool in pan 5 minutes on a wire rack. Remove from pan; cool completely on wire rack

Thursday, May 8, 2008

Here's the Hummus. Lime Series Part 1

Reading Cathy's "No Excuses" post this morning reminded me that I've been on a diet, starting tomorrow, for quite some time now (PS check out her pictures, they're fabulous). While training for the half marathon, I was ravenous at all hours of the day as I was burning so many calories and loving every moment. It was like high school all over again - the glory days of eating with immunity. Seriously, I used to eat an ice cream sundae for lunch.

Well, after the race, my appetite has remained that of a teenage boy, though unfortunately I'm not running anymore, taking a much needed break from strenuous exercise to give my knees a vacation. So at this point, I'm pretty much on an anti-diet: carb loading for the race that isn't to come. Yikes! So, in honor of my diet starting tomorrow, I'm bringing you a healthy, wholesome treat.

Today's recipe is courtesy of a truly humorous food blog, Urban Drivel. The hummus is lower in fat, but loaded with the 'good fats' & it uses my favorite ingredient of the moment: limes. I've become obsessed of late with using limes in my cooking. I realize limes are not an earth shattering ingredient and cooks everywhere have been enjoying their zesty taste for quite some time now. I"m not sure why they haven't joined my repertoire sooner, but because I'm a little OCD, I'm on a lime kick & the next couple of recipes will all use my star ingredient.

This Cilantro Lime Hummus is amazing. I pretty much stuck to the original recipe, though taking a cue from my friends at CLBB, I used the chickpea juice instead of water and also used a tad more garlic. Check out the original recipe here.
Low Fat Cilantro Lime Hummus
Adapted from Urban Drivel
1 (15 oz) can chickpeas drained and rinsed. Reserve juice.
juice of one lime
zest of one lime
1/2 bunch cilantro, chopped
2 Tablespoons tahini paste
2 teaspoons extra virgin olive oil
3/4 tsp salt
1 small garlic clove, minced

1. Process the garlic in the food processor until chopped. Add chickpeas, lime juice, lime zest, cilantro, tahini, 2 tsp of the oil, salt and garlic together in the food processor. Pulse 2-3 times. Add reserved juice from chickpeas until hummus reaches desired consistency (about 6 tablespoons). Process until very smooth, stopping to scrape down the sides of the bowl with a rubber spatula as needed.

2. Transfer the hummus to a serving bowl; cover with plastic wrap and refrigerate until the flavors meld, about 30 minutes. (The hummus covered can be refrigerated for up to 2 days. Bring to room temperature and season with additional lemon juice, salt, and cayenne as needed before serving).